

Just replacing the zipper in the first pair made me feel very confident. So I decided to do a tutorial for 3 reasons: 1. To show how I did it differently. 2. Her videos don't stay posted forever. 3. Some folks may not have the technology available to see her videos (I wish they did.)
***********************************
*A Tutorial Tuesday*
**************************
This tutorial has been featured
@


This tutorial has been featured
@


Obtain a zipper proper for the pants.
Use one longer than is needed.
I wanted heavy duty and had one.
I've got several zippers removed from clothing I repurposed or tossed.

Only the zipper will be removed.
No deconstruction of the pants will happen,
except for the following few stitches.
except for the following few stitches.

First clip the tack with a good seam ripper.
You may not even consider this as "deconstruction"
since it's no big deal & will be easy to reconstruct.
since it's no big deal & will be easy to reconstruct.

It was easier to clip the tack threads from inside.


NOTE:
DO NOT remove the threads that have stitched down the zipper. You will need that stitching line later.
DO NOT remove any stitching lines especially the outside top stitching.
Remember you are NOT deconstructing, so it's very important you don't take out stitches. Have I made this clear & understood?
Start cutting along the top edge of the zipper, only cutting the zipper. You might need to use pliers to remove the first tooth or two. Don't use your fabric scissors. I had enough room above the first tooth to clip across with my good scissors.

Cut away zipper just to the side of the stitching line.
Do NOT rip out the stitching. I had to say that again.


making sure you leave the stitching lines intact.
If that stitching is taken out, the pants will be deconstructed.


I'm finding pants are constructed differently,
so yours may look different.

Next the other side of zipper will be removed.

Cut as close as possible to the edge of the zipper.


Now, only the zipper has been removed
leaving in all stitches
so pants haven't been deconstructed.
Easy!
Don't worry, putting the zipper in
is just as easy.

We are applying the zipper to the overlap first.
Choose a thread that best matches your fabric.
You want the thread to blend so well that it disappears.
Not sure about using invisible thread, because it can't be ironed.

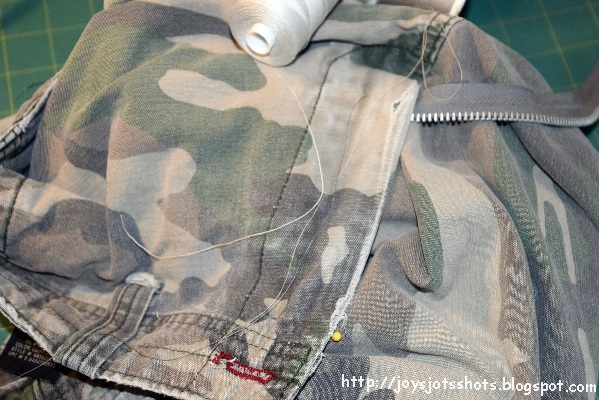
To apply to the flap, face the zipper downward toward the fabric. The back of the zipper is toward you. This is where my method starts being different from Nancy's. Nancy's method uses lots of double faced tape. I don't.
Fold the top of the zipper over toward the pants as you cannot see here, but you can 2 pictures below. Hold folded top of zipper down with pin if need.
Position zipper foot so the needle is on the right side of the foot. If possible move the needle to the left as close to foot as possible. Turn crank with hand first to make sure needle clears the foot.
Use the old stitching lines as a guideline for zipper placement. (Remember, I told you not to take them out.) I didn't pin, I just held in place. Nancy's method used double sided tape here. You can see the back edge of my zipper foot runs along the zipper teeth.

I did a second stitching line for strength by moving my needle to the right and running the zipper foot down the same path.


Zip closed the zipper.

Lay pants flat so you can tell where the other side of zipper needs to lay. At this point you'll find out if you faced the zipper in the right direction.
Notice here how the heavy "J" top stitching was not taken out. Your eye goes to that major top stitching instead of the stitching you just stitched.

Turn under top of zipper and pin where it fell when you had the pants closed.


Again use the previous stitching line as a guide for placement of zipper.

I added an extra stitch line along the edge to stabilize the zipper.

Tack the top of the zipper for reinforcement.
Set machine zig-zag for 7.0 or widest and zero stitch length.
Set machine zig-zag for 7.0 or widest and zero stitch length.
The zipper ends will be pulled on A LOT!

Fold flap on inside, if you have one, to determine where end of zipper should be.

Zig-zag multiple times over end of zipper. (7.0 & 0)
I always hand crank my machine here to make sure I don't break a needle.

I also tacked the zipper tape to help stabilize the end so as not to put stress on the stitches that hold the zipper teeth together.

Close flap on inside and find where the old tack was placed.

Use a zig-zag stitch to look similar to the original tacking stitch.
Reconstructing the tacking stitch is important, because it doesn't allow the zipper to be unzipped all the way down to the end of the zipper, therefore putting less stress on end of zipper as pants are taken off. So, there is less chance for the zipper to come apart.

I always hold my breath when I cut off the zipper below the tacking stitches that hold the zipper teeth together. THE very last step.


you can see the new stitches for the zipper.

But, when you are at a descent distance from the person,
you only see the original top stitching. I love how fast and easy this method is and am now saying, "YES, I can replace the zipper."
Would love to hear how it works for you.
Thank-you Nancy.
Again please find her zipper replacement method and her video over
@
********************************
Sharing at several Linky Parties HERE
New party just added

**************************************************************************
Thanks to the FREE programs:
**************************************************************************
Thanks to the FREE programs:
possibly used for this post
Photoscape for downsizing & watermarking photo
PicMonkey creating the icon used on this page
Pinning this! I am so scared to put in zippers. Thank you for posting!
ReplyDeleteI always say 'NO' to replacing jeans zippers, too, even for me. Thanks for the fab tutorial. Pinning.
ReplyDeleteFeatured today, Joy...
DeleteThis is pure genius! Going to give it a try. Thanks for the great instructions and pics.
ReplyDeleteHi there
ReplyDeleteJust stopped by to let you know that I featured this on my Round Tuit post this week!
Saturday Spotlight
Thanks again for linking up! Hope you have a great weekend!
Jill @ Creating my way to Success
Well, isn't that ingenious! I never thought that zippers could fray that easily. You did an excellent job at replacing it. Thank you for this tutorial. I will definitely use your method in the future. I appreciate that you showed the method without tape.
ReplyDeleteThank you for participating to my Fabric, Thread and Yarn link party. Have a good weekend!
zippers still make me nervous but this is a beautiful (can you say that?) tutorial! i would feel totally confident replacing a zipper! Thanks for taking the time to photo and explain how to do this!
ReplyDeleteThanks for this great tutorial on replacing zippers! This will come in handy.
ReplyDeleteCan you hand sew instead if you don’t have a sewing machine
ReplyDeleteI don't see why not. I believe anything can be hand stitched because there was a time before sewing machines. May I suggest the back stitch for strength and consistent stitch length and look?
DeleteI have to say WOW! I have had a pair of jeans sitting in the closet for months, waiting to figure out how to replace the zipper, and finally came across your post a few days ago. This was SO EASY! Thank you so much for sharing this cool trick. Now I don’t have to be afraid of replacing zippers in jeans!
DeleteThank you so much for this tutorial! It was so easy to follow, and made the whole process simple.
ReplyDelete