Up front let it be known ALL credit for this pumpkin pattern goes to Rose over on Threadbare Creations. Her pumpkin looks much better than mine. She offers a free pattern of 3 sizes. I made the 8 in square and added a side and bottom border.
Most
everyone when paper piecing sews through the paper and have to rip it
off. That means if more than one of the pattern is made, more paper is
used to print more patterns. (We don't hear much about saving our trees
these days.)
I
love the "No Tear" method where I reuse one pattern copy several times.
I also don't have to tediously tear away paper and the tiny bits left
behind. I just remove some pins. Small pins that is.
I
have to admit, it had been so long since I made something by paper
piecing. So that means I had to do a bit of relearning. Going back to my
previous tutorial still left me a bit confused on just how to start. Once I got started the steps began to roll. I really enjoy paper piecing. I
decided to refresh the "No Tear Paper Piecing" tutorial to, as always,
make it a bit more simple and easier to follow. I hope you give this
method a try with your scraps.
*****************
Tuesday Tutorial
******************
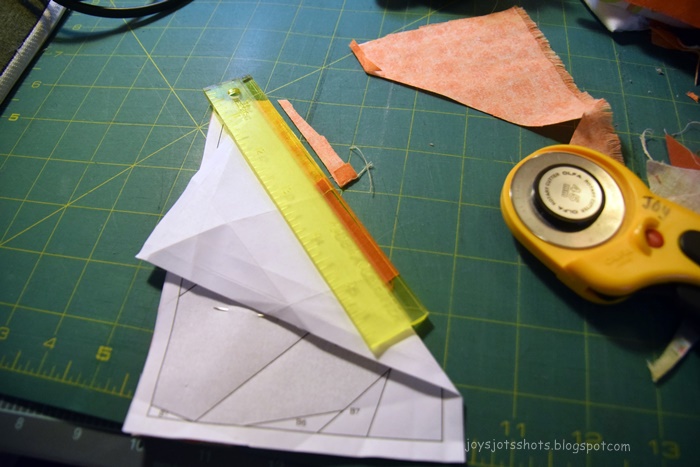
Start by using a straight edge to fold the straight lines. A beveled edge works best. Fold on the side of the paper the lines are drawn.
Fold every single line. I don't usually fold outside edges for the seam, because I don't use the pattern to sew the pieces together.
PIN
Place paper so you can see print.
Place on the wrong side of fabric
the right side of fabric will be faced down.
Paper Print side up,
Fabric print down
Normally the first section is pinned down, but when it's as small as B1 is here, then go to the #2 section and pin it down. Use two pins to keep the pattern from moving (rotating). Notice small pins are used here. This is to make sure they don't get in the way of the machine needle. Some use a glue stick. It didn't work on this fabric. It left a layer of paper stuck to the fabric. So check your fabric first if you try a glue stick. Again, pins are simply reusable.
Then proceed to fold around that section and cut away a quarter in seam.
So preparing to put B1 and B2 together.
Cut away to make the quarter in seam allowance.
I like using my "Add A Quarter" ruler that butts up against
the paper fold to rotary cut the quarter inch seam accurately.
My ruler was a lucky mark down find
that was a souvenir in Florida.
TRIM
On the back side, lay the piece of fabric so the right sides are facing together.
On the front side make sure the pattern piece is laying over the added fabric.
I have traced the shape in red here (yes, very tiny).
You can see, knowing how the brown flowered piece lays on the underside,
the red marked area is laying over the brown flowered piece.
It helps tremendously if you use what some machine manufactures call a
"Edge Joining Foot"
It has a blade in the center.
I use that blade to guide along the folded edge of the paper.
The needle position is not moved.
The needle stays in the center.
PIN
TRIM
STITCH again
Trim around the outer edge seam allowance
PIN TRIM
STITCH
the process is repeated till the last section.
Pins are kept in place
to keep the paper
as stable as possible.
When all pieces have been added, all that needs to be done
is remove the pins. When the paper is removed, you will see the backside.
For this pumpkin,
it didn't matter how the paper was printed.
In some cases as in making letters,
the printer needs to be directed to reverse the image.
These sections were sewn together with aquarter inch seam
as the paper pattern shows.
Again for the top section, the #2 section was much larger than #1,
so #2 section was pinned first.
The light background
didn't contrast well with the stem,
so black was used.
I liked the black so much better, I decided it would look better all around.
So I pinned the pattern back in place
at #2.
Doing this step first
actually helped with deciding the order
the light pieces should be removed.
The reference was immediately available.
At this point I realized such small pieces could not
have been put together
even with using the hand stitching
quilt piecing process.
Even harder would be to cut out such pieces.
were less than 1 inch.
Hope you give this "No Tear" method a try. I believe you'll find it less of a hassle
to not have to tear off the papers.
I know I'm done taking out pins,
well before anyone can tear out all the tiny paper pieces.
Now to finish the yard flag with this pumpkin.
Or maybe,
I'll just reuse my paper pattern to go
make another pumpkin for a large potholder?
***********************
This post shared @