Friday, March 31, 2023

Fun Fri~ NICU Fleece Blankets: Crochet Edging

  
I wasn't too happy with the first blanket.
This is my second one to edge. 
Still not crazy about how it finished.
 
This is my 3rd one.
Much happier with it.
Especially the work around the corner.
I loosened the tension a great deal.
 
Our Needle Handwork Group makes these.
These blankets will cover an incubator
to keep harsh lights out of the eyes of the precious one.
I understand the UK NICU serves about 90 babies at one time.


Friday, March 24, 2023

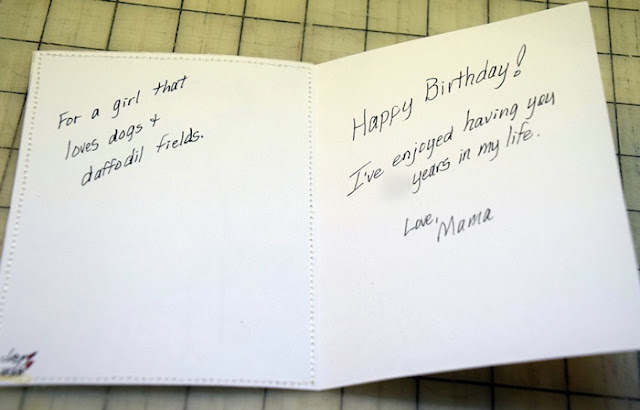
Fun Fri~ Daughter's Bday Card: Lover of Dogs and Daffodil Fields


 Here in Kentucky we get to experience some beautiful
daffodil fields.
They flourish in farm fields where once upon a time
there must have been a house close by and someone planted them.
Over time the field got cultivated or plowed
which turned out to be the perfect way to split up, divide the bulbs 
and scatter them. 
They come up, bloom and go away
by the time the farmer needs the hay
or cattle just keep on grazing.
So my daughter loves to go back home and see the fields on the back of the farm.
 We all do.

For years I have wished for a light box
when doing some of my projects,
especially the fabric collage pillows and cards.
For Christmas my friend Lenita gave me
an Amazon card.
So I got myself a light box.
The first was way too big.
This one arrived last week
and its perfect
and just in time to make
may daughter's card.
 
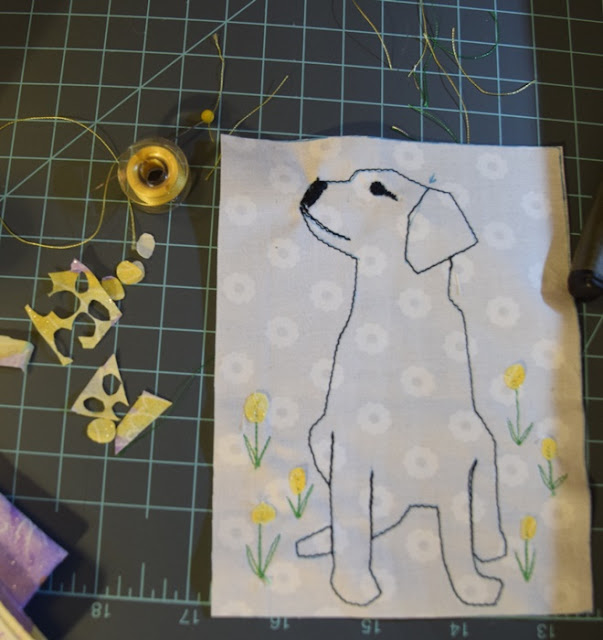
First I ironed on interfacing to white fabric.
Then traced a card template with a heat sensitive pen.
I found some blackline clipart online. 
This dog came from Clipart LIbrary.
I resized the clipart in Open Office Word Processor (free)
to fit the card front.
This lightbox made the tracing so
much easier on my old eyes.


Black thread was used to stitch the outline of the dog.

Loaded the machine with
green embroidery thread in the needle and
white embroidery thread in the bobbin.
Practiced stems.
Starting at the * in the center
straight up, down,
to the right and back
to the left and back.
Tie off (my machine has a tie off button)
or backstitch.
 
Tiny ovals were cut from yellow fabric
Machine stitch length set at 1.0
Stitched ovals with about 4 stitches vertically.
Again, I began and ended stitch with tie off,
or pull long threads to the back and tie.


Tuesday, March 21, 2023

Tues Tutorial~ Larger Travel Sewing Bag


      I keep refining my storage for my traveling sewing machine to take to workshops.  Its taking a while to decide what notions and tools I really need to take with me, while being as streamed lined as possible. I don't want to throw loose items into my sewing machine bag. It keeps me constantly digging for something. My goal is to easily unpack and pack away. Also I want things easy to reach on my work table.
     I'm not one to measure well. I tend to take the impromtu route. That's how this one is made. Don't look for any measurements. 


 ******************
Tuesday Tutorial
******************
 
I'm upgrading from this last sewing kit I made.
 
 
After the last sewing session for the QOV National Sew Day, I realized I was missing frequently used tools.
So I set out to make a larger bag to hold the extra items.
 
Found in my pile of fabrics given to me by a friend was this bright piece of 2 fabrics already sewn together.  In my zipper drawer was a zipper taken from a dress several years ago. It's long enough to go around 3 sides of the piece.
 
Zipper Tip: Remember you will need a bit extra length to do mitered corner around 2 corners. 
The fabric was quilted with some scrap batting that was pieced together.
 
Edge stitched all around less than 1/4 inch from edge.
I tried the hera marker method. Believe I prefer heat sensitive markers.


No matter how I try to look like I didn't want quilting to be exact,
it just always looks accidentally off. 
 

(At this point I compared the old with the new for space needed.)
 
No measurements needed.
Just cut and fold to fit the space needed. 
Audition pieces to be stored.
Pin for stitching to test space.
Take advantage of doubling fabric
and use folds for edges.
 
 
 This piece was folded in half
Stitched around edge
leaving an opening to turn 
inside.
 

Stitch down pockets when satisfied with placement.
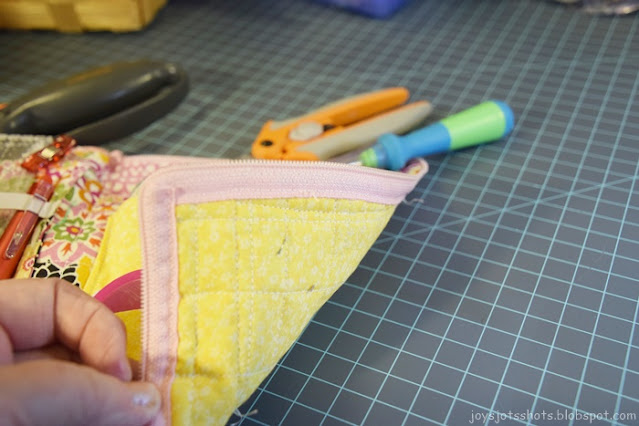
The zipper is a brain twister.
Sew the zipper right side up
on the inside.
Because you want the zipper to face outward later.
Sew along the teeth of the zipper.
Then roll the zipper over the edge
as you see here,
and top stitch along the outer edge of the zipper.
This method finishes off the edge.
Its unlike the method normally used for bags.
Look for a more detailed future tutorial for this zipper application.
 
Above is the outside view
Below is the inside view of the zipper


Now you can see, this bag has a spot for a:
rotary cutter
2 marking pins
6x2 ½ inch ruler
Snippers/cover
Large seam ripper
3 clips
Thumb pin cushion/pins/needle
Measuring Tape
Measuring Gauge
Small Protractor
2 Skewers (my stiletto tool)
Plastic stiletto

I see I need to add a 6 inch sewing gauge
thimble

A piece of scrap fabric is tied to the zipper pull
 to make it easier to hold and pull.
 

The ends of the zipper tape overlapped to finish the edge.

The length of this zipper worked out perfectly for
the 3 edges of this piece. 
Remember you have to miter 2 corners
so you'll need a bit more in length for that.


Amazing how much more the doubled space helped.

Fits very nicely with the machine in its bag.
 
Along with large white spool thread
Thread stand
12x6 quilting ruler
12x12 cutting mat
extension cord
along with the machine's peddle and plug
The machine feet, screw driver, extra bobbin and tweezers
are in the front pocket of the bag.  
 
I'm ready to grab and go. 

This impromtu method
could be used to make any size bag 
to hold any group of items.


Saturday, March 18, 2023

Quilt Shot Block 155~ Split Back Star: 2023 QOV Block of the Year

  
Split Back Star
12½ inch square
 
 
     Saturday, February 4, 2023 was QOV National Sew Day. Our Elkhorn Creek Quilt Guild did meet on that day. While some of us worked on 1 Mystery Quilt, one of the members worked hard to make block kits by taking a donated 5 inch square bundle and cutting them up in pieces for this year's QOV block, Split Back Star. 
 
    I brought home 6 of those kits.  

 I pulled up the directions found on the Quilt of Valor site. The pattern is free for anyone. You can make the blocks and donate them to Quilt of Valor to be used in quilts to award to those that served during times of conflict. 

It is a rather easy block to make.


I can understand why this block was chosen.
It is very versatile.
It can be arranged into different patterns.


I think the 5 inch bundle made some pretty 12½ inch squares.
 
 Shared @