

Remember the last quilt shot block, "Rick's Paradox?" It was a practice piece for using the design as a quilting design.
Here's how it was turned into an envelope pillow cover.
************
First, had to have a pillow form. Had this project in mind on the 127 yard sale last weekend. Came across a table that was left in a yard and marked free. On that table was a very firm & clean pillow.

When I got it home, it went straight into the sanitation cycle of the washing machine.
Below is the results of a 15 minute attack on this pillow


The block was trimmed leaving the same widest border possible all around
which was 1 inch in this case.
After laying the quilt block on the pillow form,
which was 1 inch in this case.
After laying the quilt block on the pillow form,
it showed to be too small.

Quick measurement of the width of the pillow.
THE only measurement made to put the pillow cover together.

Needed 1 more inch on each side, so.....
Cut 1½ inch strips (1/2 inch for seams).
Cut 1½ inch strips (1/2 inch for seams).
Notice I didn't measure length, just made sure they were longer than the pillow.
No rocket science needed here.

Added strips to opposite sides.
I'm right handed so the heads of pins are to the right of my sewing,
which made it easier for me to remove the pins as I sewed.

Let the quilt block be the guide to cut the strips.

Added strips to the other opposite sides.

To make the envelope back,
about 1/3 of the top was folded over. No, I did not measure.
Used this folded piece as the pattern to cut 2 pieces for the back with about 1 inch extra for hemming.


Hemmed the edges of the 2 pieces
that is the opening for the back,
Hem was double turned & machine stitched.

Right side of pillow top was laid facing right side of both backs.
Overlap back pieces as needed to fit the pillow top.

Pinned at all 4 places where the overlap stopped and started.

Stitched around all 4 edges.
Back stitched 2 or 3 times over all 4 overlapped areas.
These 4 places will be high stress points when inserting the pillow form.
Turnned right side out.
I use to clip corners to eliminate bulk.
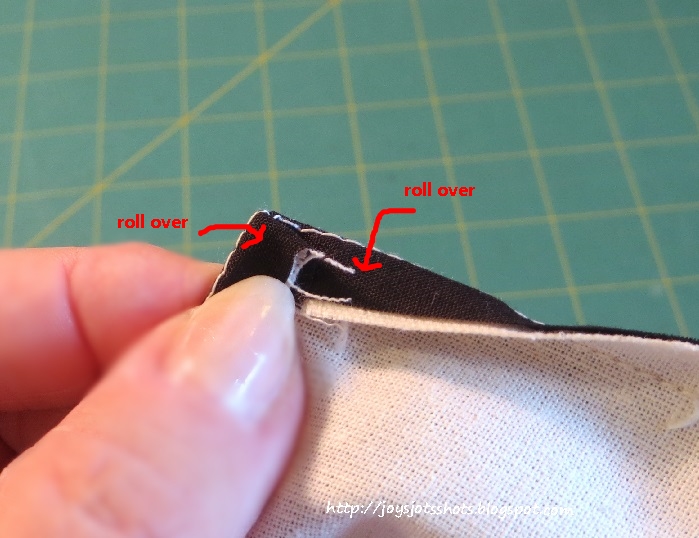
I folded down both edges of a corner.
As I held the corner with my left hand like I'm doing here,
I reached inside the pillow case with my right hand,
and pinched the corner to hold & pulled out.

Some gentle persuasion with a pin made a square corner.
Since it's not going to lay flat in this pillow, no need to worry about bulk anyway.

Done.

Putting in the form required some assertiveness.

Even rolled it a bit to persuade it to get under that other flap.

Some would stitch this closed, but no need because it's not going anywhere.
Besides, the purpose of an envelope pillow case
is to be able to take it off easily and be cleaned
without the need of a zipper.

I like the way the black border strip
makes the paradox design pop a bit more.

So, impress your friends!
Make something that looks like it was hard to make.
Quilt a Paradox Pillow!
Quilt a Paradox Pillow!
Zentangles are supposed to be relaxing,
but I get anxious to finish,
because I want to see how it's going to look.
because I want to see how it's going to look.
***************************
Sharing at several Linky Parties.
&
http://shabbynest.blogspot.com/2015/08/frugal-friday_20.html
http://www.shakentogetherlife.com/2015/08/creativity-unleashed-link-party-august.html
http://www.finecraftguild.com/share-it-25-triangle-lace-scarf-crochet-pattern/
***************************
Sharing at several Linky Parties.
&
http://shabbynest.blogspot.com/2015/08/frugal-friday_20.html
http://www.shakentogetherlife.com/2015/08/creativity-unleashed-link-party-august.html
http://www.finecraftguild.com/share-it-25-triangle-lace-scarf-crochet-pattern/
***************************
PhotoScape used to resize & watermark shots
Free Download @ http://www.photoscape.org/ps/main/index.php
I've been using this software in place of Photoshop for several years.
Lovely pillow cover. The quilting is stunning!!!!
ReplyDeleteI love zentagles, and you did an awessome jjob!
ReplyDeleteWow! You sure know how to transform a pillow. From mmmm... to wow! Thanks for sharing it with us at SHARE IT 25, on www.FineCraftGuild.com Love having party with us and looking at your contribution. Hope to seeing you this coming weekend again! ~ Rose
ReplyDelete