

A simple scrap quilt named:
Grandmothers' Quilt

Mr. G never got to meet his first great grand daughter.
I was greatly honored when her grandmother
brought me fabric that her great grandmother had bought
along with backing, border and batting she bought herself
and asked if I'd make
a quilt for the little one's first birthday.

She liked the "Charm Pack Baby Quilt" by Diary of a Quilter
and told me the size she wanted the quilt.
Do I follow a tutorial pattern like this?
No, I just need the visual and make the size needed.
 So I calculated the size the squares needed to be

and how many were needed.

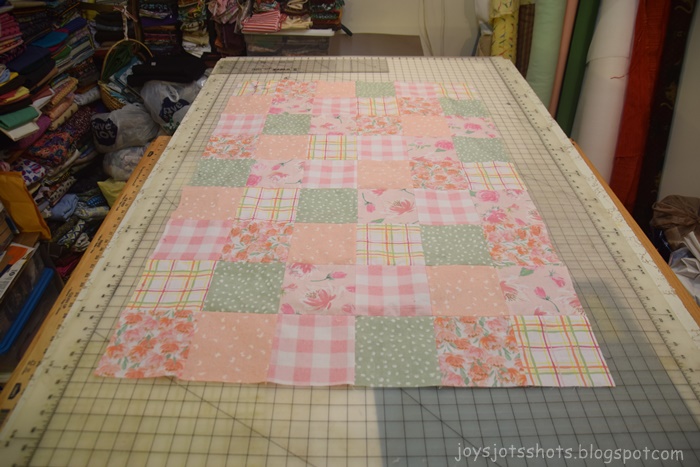
 I decided to cut 5.5 inch squares


and 4.5 inch strips for borders.

The solid fabric was not needed for the patchwork.

I learned quickly they all are NOT cut square.
I did find out you can cut twelve 5.5 inch squares from a fat quarter
by using "New Quilters" resource site
Why reinvent (recalculate) the wheel when someone already took the time?
This resource has also found the most efficient way to cut fat quarters.


Very light spray basting was used along with pins.
Polyester batting.


A quick hand basting was done around the edge
because this was going to be quilted on the machine
rather than in the Dream Quilting Frame.
When I quilt on the machine,
I feel like the layers can shift easily,
so I do more to stabilize the layers.

I decided to pull out Ms Ellisimo which I retired from quilting last year.
She couldn't handle stitching layers,
but still does a fine job embroidering.
Most importantly, the software still works on my computer.
Soap box: I'm so tired of expensive software
becoming outdated with operating systems.
What a waste and money grabber.

 (Names were deleted with Photoscape to protect privacy for this posting.)


This turned out to be about an 8 inch square label.
It was finished and added to the backing
using the process I posted recently
for the Memory Pillow Labels.
 The quilting was a simple quarter inch from each side of each seam

using the edge of the single stitch foot as a guide
which turns out to be about a quarter inch.
The first quilting method I used years ago.
I started at the top down to the bottom
I started at the top down to the bottom
then side to side.

Some I scratched out with finger nail to coach the fibers back in place.
I usually dampen and iron, but irons don't
work well around polyester batting.

 I accordin fold the binding


and lay in the drawer.
A roll of binding hops around too much for me.
Oh, can you see why this machine is now my quilt maker machine?
Look at the wide throat of this beast.


What a great project and so pretty the result too. I'm sure the little one will love it for years to come.
ReplyDeleteThis is so pretty. I love those colors and you've done a wonderful job coordinating those squares. Such a beautiful memory!
ReplyDeleteWhat a sweet little baby quilt. No roll or spool for me when I am attaching the binding. It lays in a loose wad/pile in the open drawer of my sewing table.
ReplyDelete