

Some of the schools here don't allow large book bags, because the schools are so crowded. They call for draw string bags. The draw strings can be uncomfortable, so when I saw this idea of a strap used as a drawstring, I thought it would be more comfortable.
I designed this bag from an idea I found in a Fons & Porter Magazine. Their bag was made with pre-quilted fabric. I've designed this back pack to be lined using woven fabrics.
This pattern was made for a Beginnner's Sewing class I taught at the Birdsong Quilt and Craft Shop here in town. Although there are many steps and looks complicated as you scan through this post, it's very quick to cut and sew. You can make one in 2 to 3 hours depending on your skill level.
You only need 1½ yards of fabric, so for 5$ a yard you could have a back pack for 7 bucks! Better yet, recycle some old clothes?
******************
Tuesday Tutorial
******************
Here is the very simple pattern.
You really don't need the paper pattern.
Just cut the measurements noted.
For future reference, use this easy chart to cut the simple pieces you need.
Download HERE.
Update: Google keeps blocking this download and requiring permission.
I've tried my best to clear the required permission.
You can right click and print the jpeg below. It's the same as the download.

Note the picture below is upside down to the pattern.
The fold is at the top of the fabric whereas the fold is shown at bottom on pattern.
The fold is at the top of the fabric whereas the fold is shown at bottom on pattern.
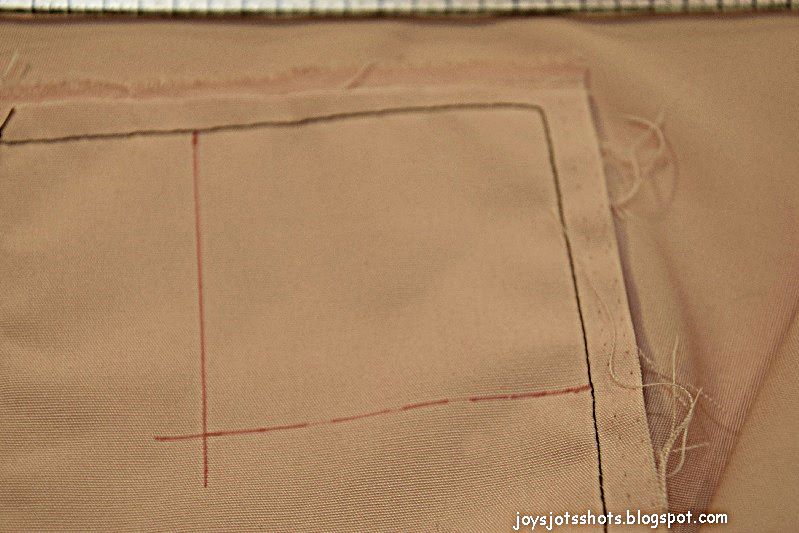
Measure the 17 inches for bottom trim from selvage edge.
*************************
Cut Pattern
*************************
Cut Pattern

I transferred the measurements to make a tissue patterns
so beginners could have practice pinning and cutting out a pattern.


********************************
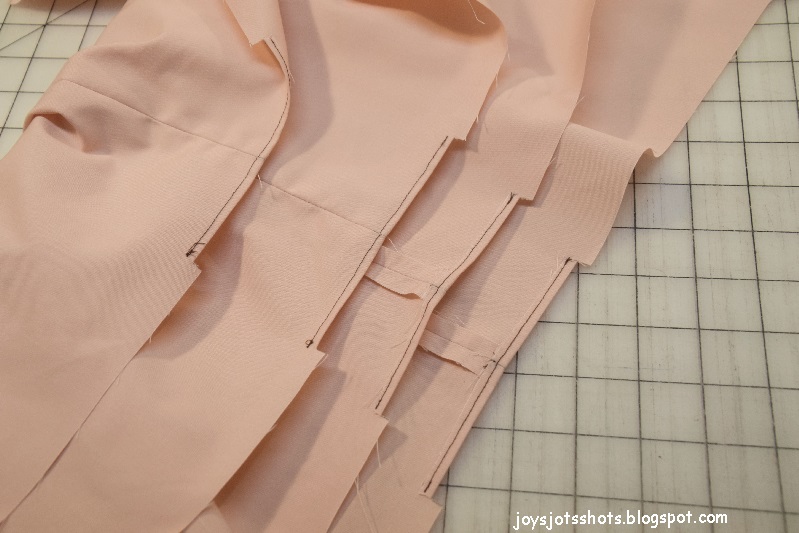
Bottom Trim

Take the bottom trim and lay on front and back pieces
four inches from the bottom as shown.
The trim is simply added a second layer for reinforcement of the bottom of book bag.
 Stitch 1/2 inch seam.
The trim is simply added a second layer for reinforcement of the bottom of book bag.

Flip & do a 1/2 topstich.
Trim sides and bottom to be even if necessary.
Use 1/2 inch seam to sew trim to front and back.
Flip down trim and press.
*******************
Adding Pockets to Lining

Use your favorite method to add the pocket to the front lining.
Use leftover pieces to make more pockets if desired to add to the lining.
If you can do a great job topstitching,
add a pocket and buttoned flap to the outside of your bag.
Use scraps to make contrasting pockets?

*****************
Sewing Front/Back to Linings


Throughout the lesson, we were reminded to clip threads.
*********************************
Preparing Channel Openings for Straps

mark as directed in picture above.
Between the snips, turn up ¼ in, press and stitch to hold.
****************************
Stitching Front to Back

then pin outward to the corners.
Double pin at starts and stops to remind where NOT to stitch.
Be sure to match the trim seams.


****************************
Making Box Corners- Outside Only
The lining will not need boxed corners.

Measure 2½ inches on stitched line as shown,
not outside edge.
Boxed Corners


****************************
Making Strap Channels


Flatten corner so bottom seam meets side seam.
Stitch across marked line.
****************************
Making Strap Channels

Using opening in lining,
turn bag inside out,
and stuff the lining inside the bag.
Reposition the top seam to be at the the top.

Press the fold at the seam.
Top stitch ¼ inch from top edge as shown.
Mark a line 2½ from top edge, and
stitch along that line.

This picture shows the bag upside down.
*****************************
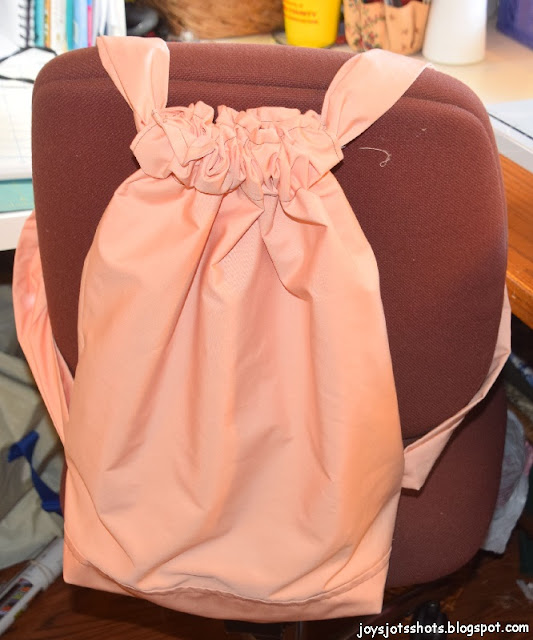
Making the Straps

Of the 4 inch piece that was cut on the fold,
sew one piece to each of the other two 4 inch pieces as shown,
giving you 2 straps about 60 inches long each. Trim & press open seam.
If you are a quilter, this is like you combine pieces for binding.

Fold in half lengthwise.
Stitch long edges of strap. Do not stitch across the ends.
Turn inside out.
Press seam to middle.

********************
Finishing Bag
 Thread each strap through channel as shown.
Opposite directions, overlapping each other.
After straps are threaded through channel,
safety pin ends together to prevent slipping back through channel,
and help to thread through holes at the bottom of the bag, where holes have been made.
 Pull the lining back out and find the hole in the bottom of the lining.
Insert hand to find the holes near the bottom trim.
 Pull the ends of one strap through each side.
 Use the safety pin to hold strap in seam,
while trying on to check for proper length.
 Use multiple stitch lines to reinforce this heavily stressed point.
Stitch lines aren't overlapped, to make easier deconstruction in future
for possible adjustments due to size changes of person wearing bag.
 Close lining opening with desired method.
Look for future Flip Pocket tutorial.
If you need more details, please email me or leave a comment.

Press seam to middle.

********************
Finishing Bag

Opposite directions, overlapping each other.
After straps are threaded through channel,
safety pin ends together to prevent slipping back through channel,
and help to thread through holes at the bottom of the bag, where holes have been made.

Insert hand to find the holes near the bottom trim.


while trying on to check for proper length.

Stitch lines aren't overlapped, to make easier deconstruction in future
for possible adjustments due to size changes of person wearing bag.


Look for future Flip Pocket tutorial.
If you need more details, please email me or leave a comment.

These girls were apparently proud of their book bag they made.
They put them on and wore them out the store!
*******************

You'll find this post at several Linky Parties. Please check them out for some great ideas.
My free pattern for a Draw String Back Pack.
Thanks to
GIMP for cropping & other digital effects
PicMonkey creating collages used on this page
Photoscape for downsizing & watermarking photo
Such an excellent idea to make straps instead of strings!
ReplyDeletePinned
I loved this really detailed tutorial and all the photos Joy. It makes it so easy to follow and it's a wonderful sewing project for beginners plus they get to make something that's functional. I bet everyone of the girls are bragging at school that they made their own back packs ;-)
ReplyDeleteA great idea to use straps instead of drawstrings, Joy - so much more comfortable. As always, a comprehensive and easy to follow tutorial. Featured today...
ReplyDeleteGreat tutorial! Thank you for linking up at the #BloggingGrandmothersLinkParty. I pinned your post.
ReplyDeleteThanks, Joy, for linking up this great project on #BloggingGrandmothersLinkParty!
ReplyDeleteThanks Joy for the pattern and linking up at #BloggingGrandmothersLinkParty have a great day!
ReplyDeleteSuch cute backpacks! The wider straps were a very good idea. Thanks for the pattern and thank you for sharing at the #BloggingGrandmothersLinkParty!
ReplyDeleteThank you for sharing at #BloggingGrandmothersLinkParty
ReplyDeleteThe pattern link says that I do not have access :(
ReplyDeleteI'm so sorry. I'm so frustrated with google. Multiple times I've checked the box that is to allow anyone with the link to download the pattern. It still doesn't work. That is why I finally put the picture of the pattern on the post. You really only need the measurements. You can right click and save the image which will be what the download would have been.
Delete