
Seven Shirt Quilt
I first made this quilt which I named 7 Cowboy Shirt Quilt back in 2013.
I shared some pictures of my work,
but so has to not "steal" the author's work,
I didn't repeat directions but rather linked to the site. I followed the amazing concise directions @ Life is a Stitch.
Unfortunately, the link has since disappeared.
My 2013 page has gotten a lot of hits and people asking
if I knew where they could find directions.
When my cousin turned over to me several of her Dad's shirts
to make her a memory quilt,
I knew then I had an opportunity to try to recreate the directions.
If the original artist has a reason for me not to do this,
please let me know.
Turns out this past June I was going through some old computer files,
and found my notes and pictures when making this quilt!
Lesson learned: If you really want to save a web page, print it out,
or copy as much as you can to a word processor.
Even though the original artist was able to give directions in one post,
I have a hard time being as concise.
So this post will only get the process started.
EnJOY!
***********************************
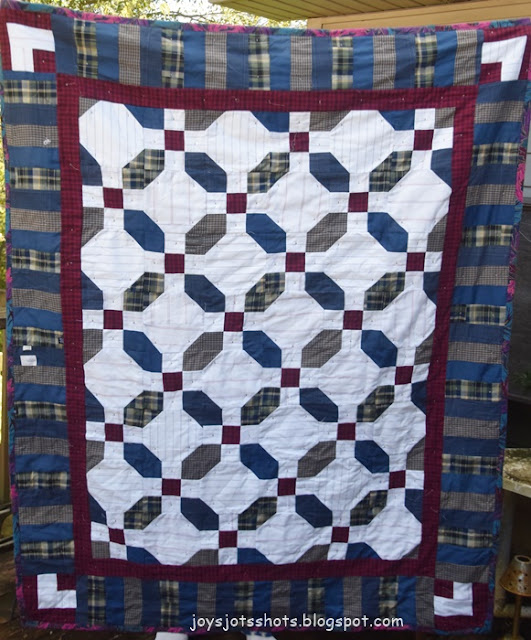
Choosing 7 Shirts

The first one I made used the Xlarge type shirts which worked great.
These shirts were smaller.
I was lucky to have a matching pajama pants to complete the project.

2 light color
5 dark color one of which will be an accent color.
Here the choice for accent can be the gold or the red.
The accent color should be one that pops.
Look at the picture of the quilt to see how the accent color is used.

My choice for accent was red.
The red had a matching pj bottom.
Cutting Apart All Shirts
Don't bother to pick apart the seams. Not worth it.
On the other hand, I've seen people rip apart the seams.
I think that tends to stretch the fabric too much,
and it can be hard on old shirts.
So get out your scissors and cut carefully along the seams.
Save every quarter inch you can.
You might wish later you had just that much more fabric.

I don't throw anything away until it's over.
If you know me, I've made things out of the smallest scraps.

Cut off hem.
I save them for ties.

These can be used for ties as well.
"Life is a Stitch" saved the buttons to tack the quilt later.

Cut off the seam.

Most shoulder seams are flat felled,
so cut on both sides of the seam.
This will make for easier cutting later if you use rotary cutter and ruler.
Again, this seam can be another string.


this is not a large shirt.
You should be able to get a 2.5 inch wide strip from the yoke later.

An organization tip:
I stack and roll the pieces for each shirt and
tie each shirt roll with the hem string.
********************************
Next week: How to cut needed pieces from the 7 shirts.
So get your shirts chosen and cut up and ready to go.

An idea from "The Thrifty Quilter" blog that has been deleted from the internet.
This looks like such fun! I wish I had my dad's old shirts because he was a huge fan of plaid...DH doesn't wear fabric shirts and instead prefers t-shirts and sweatshirts. My dad used to put on a rather loud plaid shirt and accompany the ensemble with a pair of even louder houndstooth pants - and then he'd sit back and wait for me to inform him that he looked absolutely dreadful. He, of course, didn't care and thought it was highly funny.
ReplyDeleteWhat a fun topic. I may snoop in hubby's closet -- although I don't think he has too many plaid shirts! I think the quilt design would look great in red, white and blue also.
ReplyDeleteYou've just come up with a great QOV idea!
DeleteWhat a lovely quilt finish, Joy!
ReplyDeleteThe front of shirts with the buttons make fantastic backs for cushions ... no need to add a zipper, just use the buttons(buttonholes to insert the inner pillow.
ReplyDeleteThat's a great idea!
Delete