


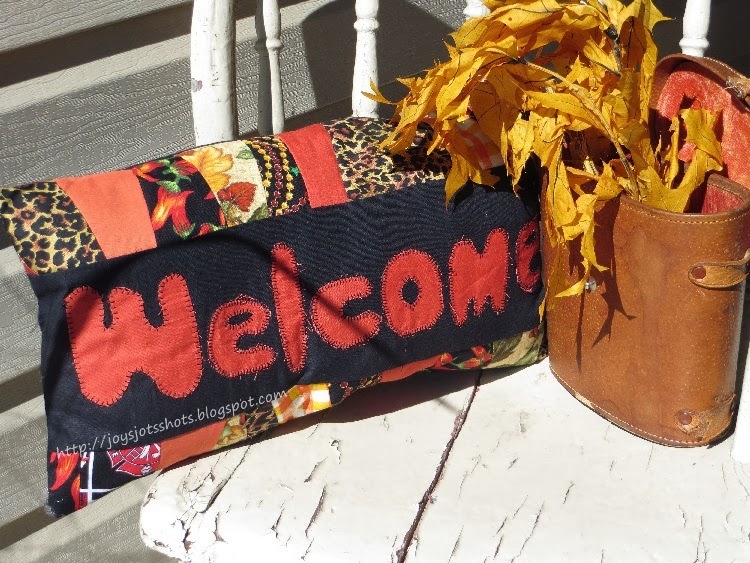
Here is a way to use some of your scrap fabrics to say hello to visitors and those that pass your home. It's a fall welcome pillow for your front porch chair.
***************
Recently we stopped at the Peddler's Mall in Elizabethtown, KY and I saw this pillow.

I didn't care for what it said; however, it popped an idea into my head.
A welcome pillow!

Here's your tut with a bunch of pictures- cause I'm a visual learner too.
*******************
I started with a black piece of fabric about 24 X 19½ inches.
Cut off a strip about 5 inches wide x 19½ for the "welcome sign."
Note: You might get strips of black from old slacks or top you can't wear anymore.

Cut letters freehand from strips of fabric like I used to cut my letters for school bulletin boards.

Set machine on blanket stitch and reversed so I could stitch along the outer edge.

Used some scrap tear away stabilizer that was just the right size for this project.
It just kept the fabric from puckering and wrinkling.

This is why I reversed the blanket stitch, so the running stitch goes along the outer edge.
This is a time when it's great to have the automatic foot feature that will lift the foot each time you pause, so you can gradually turn your fabric as you go around the edge of the letters.

At this point you could stop if you have a need for a strip with the word "welcome."

But I had some pieces of fabric to use that reminded me of fall colors.

I cut 2 more strips 3 inches wide each.
They became the base for my strip piecing.

First piece I sewed to the black and cut off the left part in a straight line at an angle.

Next piece sewed, flipped and ironed.

Some pieces I had to make sure they extended over the edge, so when I flipped, it would cover the black.

Some pieces needed trimming after I sewed.
If this were a pillow not to be viewed from a distance, you might consider some decorative stitches over the top of the seams like the old rag quilts.
If this were a pillow not to be viewed from a distance, you might consider some decorative stitches over the top of the seams like the old rag quilts.

Trimmed off excess along edge. I used my rotary cutter and ruler.

Did a quick trimming of the stabilizer. Wasn't too worried about it.

Pinned and stitched the strip pieces to the "welcome" piece.
I cut the remainder of the 24 inches of fabric in half and stitched those to each of the strip pieces.

Turned under the top and bottom edges about 1/4 inch.

Then determined the center of the piece by folding in half (somewhere across the middle of the letters.) Folded, right sides together and overlapped the center about 2 inches.


Pinned and Stitched.
Turned right side out, and used some stuffing I got in a $1 bag of fabric about 2 weeks ago on the 31W Yard Sale.
Note: If it's an outdoor pillow for display only, consider taking old clothing you want to get rid of, & cut it up in small pieces to stuff the pillow.
Note: If it's an outdoor pillow for display only, consider taking old clothing you want to get rid of, & cut it up in small pieces to stuff the pillow.

Yes! I pinned instead of hand stitched it closed, because come Christmas I'll remove the stuffing & use it for the next seasonal pillow, and fold away the pillow covering for future use. Easier to stow away pillow covers rather than pillows.
Clean off the fuzz......and.....

Done!

Related Link
************************************
Sharing at several Linky Parties.
Thanks to the FREE programs:
possibly used for this post
GIMP for cropping & other digital effects
Photoscape for downsizing & watermarking photo
PicMonkey creating collages used on this page
What a cute pillow and great tutorial! Perfect for fall! Thanks for sharing.
ReplyDeleteFreemotion by the River Linky Party Tuesday
How super fun this pillow is!! I LOVE love LOVE the scraps...! You rock, girl!
ReplyDelete:)
hugs x, Crystelle
Crystelle Boutique
I've got a huge bag of scraps - now I know what to do with them!
ReplyDeleteNice job! My better half would love this!
ReplyDeleteYour pillow is adorable. Great tutorial. Thanks for sharing at our Thursday Favorite Things hop.
ReplyDeleteAngel
"sew" cute! Thank you for sharing at the Thursday Favorite Things hop. I featured you on facebook ♥
ReplyDeleteI'm stopping by from the Naptime Crafter's Linky Party - what a cute idea! I love what you did with the letters!
ReplyDeleteI'm lovin' the scrappy pillows - I make some myself. This looks very nice on your fall porch. Have a Happy Day! visiting thru USS Crafty party. New follower :-)
ReplyDeleteAbsolutely stunning!
ReplyDeleteGreat tutorial and a super idea :)
Thanks so much for sharing on Tutorial Thursdays Linky Party. Your post will be featured during this week.
x
Natalie
Marigolds' Loft
P.S. Pinned :)