
The intent is to list the squares here in a scaffolded method to teach skills from beginner to higher level. Each square will have the objective to teach a new different sewing technique building on previous skills.
Each finished square is to be 5.5 inches.
Note with only 5 classes, students should be aware that on 2 days 3 squares will need to be made.
Note: The instructor should demonstrate the directions instead of just explaining.
Square 1= Simple straight and decorative stitching
Objectives-
*The student will be able to identify the spool pin, threading guides, thread take up or lifter, bobbin winder, bobbin, bobbin case, foot, feed dogs, foot pedal, hand wheel, stitch & width regulator and stitch selection button.
*The student will be able to thread the machine both top and bobbin to be able to use different colors of thread.
*The student will be able to control the machine and sew a straight line.
*The student will be able to use different functions & stitches their assigned machine and sew them in a straight line in a variety of colors of thread.
Directions- Various stitches are stitched in straight lines directly on the 5.5 inch square.

Square 2= Curve stitching
Objectives-
*The student will choose a tightly woven fabric. (If fabric ravels easy, this square will come apart).
*The student will stitch curved corners to make a circle.
*The student will sew a spiral circle.
Directions-
- If need use a pencil or marking instrument to mark a spiral on the circle. The center should be larger than quarter size.

- Thread the machine with a contrasting color thread to the circle fabric.
- Pin, if need, the circle to the 5.5 inch square.
- Starting from outer point stitch the spiral.


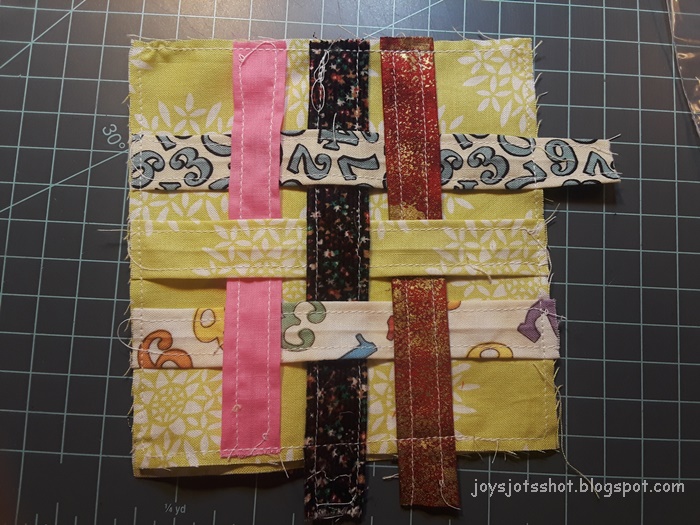
Square 3= Weaving Strips
Objectives-
*The student will identify various types of fabric for feel, texture and color.
*The student will manipulate fabric to fold accurately into a straight strip.
*The student will be able to use a pin to hold fabric in place.
*The student will sew a straight stitch along the edge of a piece of folded fabric.
*The student will sew a quarter inch seam.
Directions-
- Students may need to practice using a pin and pinning fabrics together.
- Choose six strips of 1.5 inch wide fabrics by 5.5 inches long from provided strips that have already by instructor been ironed in half lengthwise to the center of the strip, then each side folded to the center folded mark again.
- Sew along edge of both sides of each of the six strips.
- Lay the strips on the 5.5 inch square in a woven fashion.
- Sew the ends of each strip to the edge of the square using a quarter inch seam.
Square 4= Prairie Points
Objectives-
*The student will identify various types of fabric for feel, texture and color.
*The student will manipulate fabric to fold accurately into a prairie point.
*The student will be able to use a pin.
*The student will pin different edges accurately together.
*The student will sew a quarter inch seam.
Directions-
- Students may need to practice using a pin and pin fabrics together.
- Choose two or four 4.5 inch squares of various types of fabric for tactile and visual purpose.
- Fold the square into a prairie point style by folding to meet opposite corners, then the other 2 opposite corners. (Pressing would definitely help if an iron is available. Otherwise students will learn about finger pressing.)
- Pin the raw edges of prairie point to one edge of the square. Meet the edges accurately on top of each other.
Sew the edges together using a quarter inch seam or guided by the edge of the machine's foot. - Repeat steps 1-4 to make a prairie point for all two or four sides of the square.

Square 5=Loop
Same objectives as for square 3.
Directions-
2. Fold each side. Finger press or use iron.
3. Fold each side a second time.
4. Stitch each side as shown in picture below.
5. Place on square as shown and stitch 1/4 inch from the edge. Trim along edge.


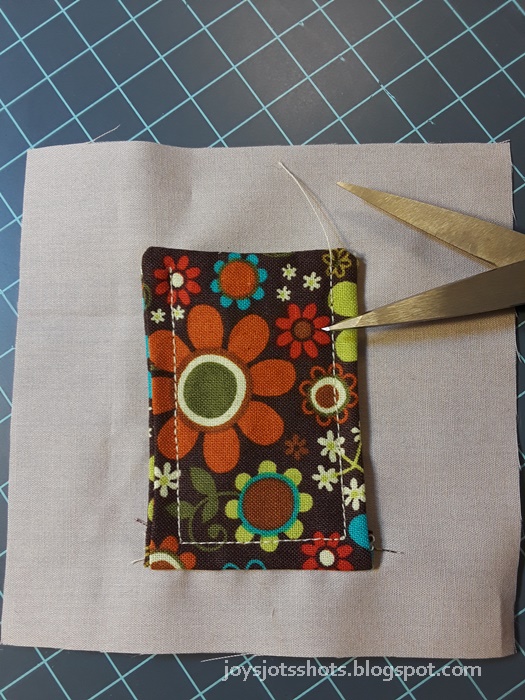
Square 6= Pocket 


 Square 7=Pocket and flap (Remember Square 5)


Square 6= Pocket
Objectives-
*The student will cut fabric for pocket with understand a seam allowance will be needed.
*The student will show understanding of right sides of fabric vs. wrong.
*The student will show understanding of the term, "turn inside out."
*The student will be able to topstitch a pocket in place.
Directions
1. Cut a piece of fabric that will be long enough to fold in half and wide enough to fit on your block.
2. Fold fabric in half as shown below and stitch around 2 long sides and 1 short.
3. Turning fabric inside out to hide seams.
Top stitching


Square 8= Simple Raw Edge Applique using STRAIGHT stitch. (Remember Square 2, curves)


Square 9=Couching Stitch (zig zag stitch over another thread(yarn))
Remember Square 1 zig zag length/width
Remember Square 8 Applique


Square 10=Pleating (Remember Square 3, meeting edges)


Square 11=Crumb Piecing

Click HERE to find directions for this square.
**************
When you have 8 or 12 Squares, put them together to make fidget quilt.
Make 2 of same type if need.
Squares 1 and 2 must be square to use them.
Other squares you might make:
Square-Lace and other decorative applications
Square- ruffle/gathers- Using different stitch length
Square-zipper - using zipper foot
Square- Raw edge applique with zig zag stitch
Square-Button and button hole -using button hole foot
Square-Design your own
No comments:
Post a Comment
Have a JOYful day!
Leave a comment or an email if you like.
I will enJOY either.
Please LEAVE YOUR EMAIL ADDRESS if you need a reply.