Tuesday, January 30, 2024

Tues Tutorial~ Quick Country Style Drawstring (Gift) Bag


  The farm guys in the family have traveled twice in the past year to sell cattle. So for Christmas I made a drawstring bag to hold their gift and also thought might be suitable for a cowboy hat wearing guy to stash away in his clothes bag. I don't think they carry rolling suitcases? 
   The thing that takes me time in making draw string bags, is threading the string through the casing.  I require 2 strings so it can be pulled from each side. That means double threading. I've decided this type of casing works easiest.


*****************
Tuesday Tutorial
******************

Please do not get hung up on measurements.
My green pieces were already cut when I got them in a scrap bag.
You use the size you need to hold your gift. 
These 2 green pieces are 12½ inch square.

These pieces are laying on a 1 inch grid. 
 

The brown pieces to be the channel to hold the string,
is cut 1 inch shorter
than the width of the main piece.
This brown piece is 11½ x 4½ inches.


Fold each end of the brown pieces 1/4 inch and top stitch.
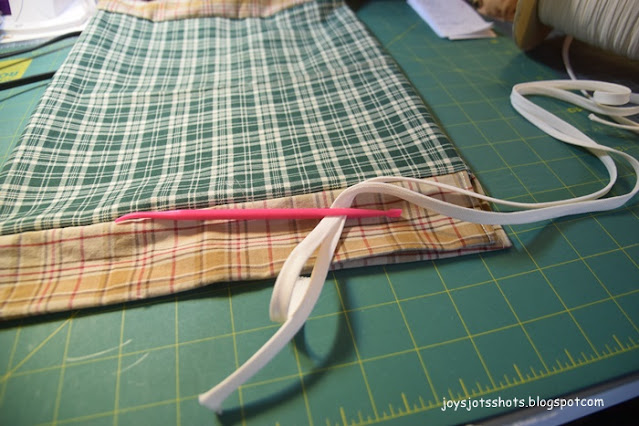
Then fold the pieces in half lengthwise "hotdog style" to meet raw edges.
Stitch to green pieces as shown.
A serger was used here for a clean finish.
 
Notice the ends of the brown piece is short on sides
by a seam
so you have room to stitch seams
without catching the string channel in the seam.
My bag needed to be longer,
so I added pieces to the bottom.
You do what you need to fit your item.

Starting below the string channel,
use your favorite seam finishing method.
A serger was used here.
You can use the French Seam if you have enough seam allowance.


Cut or make your string to go about 2 inches beyond each side.
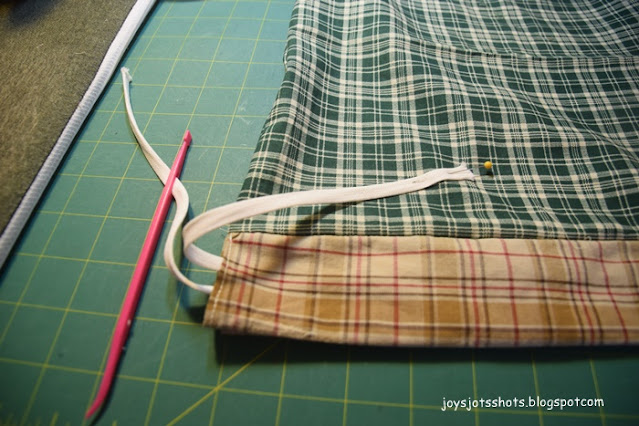
A tip I saw recently was to use something like this thing
that could hold 2 strings at once.
Slide both strings through one side at one time.
 

Pin one string down
and take the other through the other side.
Tie the first string off (see on right)
then slide the other through the other side and tie.
Done.
 
I added a key chain trinket that came in this box,
because they are all deer hunters.
The red ribbon is attached to the gift tags I made. 
 
Hope this tutorial was easy enough to follow
to make any size bag
with the size of fabric pieces you have.
 
Consider piecing together fabrics to make a patchwork bag.


Friday, January 26, 2024

Fun Fri~ Holiday Pillow Covers

 
For this past Christmas I decided
I'd give my daughters and grand daughters
a pillow with a generic colored cover
for anytime use.
With it they got a pillow cover for Easter.
The applique was just a free image downloaded
from a blackline masters site.
I plan to make pillow covers for other holidays in the future.
The popular vote for the next pillow cover was 
Halloween.
I might throw in a patriotic one as well
since I have QOV scraps.
(Mr G's ole sitting spot)
 

Thursday, January 25, 2024

Thoughtful Thurs~ 2nd Grand's 2024 Bday Card

 
She's the Mother of my first Great Grand Child.
This was my last visual of them
on Jan 1 after I had lunch with them.
They were walking down the strip mall corridor
on their way to another store.
Unfortunately, I didn't have my phone with me to take a picture.
However, I froze this in my mind, knowing it would be the next card.
 
Since I didn't have a photo to go by,
I sketched out a picture the best I could.
I think this helps my muscle memory anyway.
The pieces aren't cut out.
Instead I free hand cut the pieces.

 
My pallet has been out all through Christmas.


Tuesday, January 23, 2024

Tues Tutorial~ 2023 Christmas Postcards with Free Dove Embroidery File

 
For the past few years, I have embroidered a Christmas post card for all my Church Family and for the family and friends I mail a card. 
 
You can find them here and some of them also have free embroidery files. 


*****************
Tuesday Tutorial
******************

First I used Open Office Writer, a free program
to format a card. 
The font you see here is called Curly Stars
which was downloaded free from DaFont.
I was able to print 4 cards per card stock sheet.
My favorite way to cut apart
is the same as cutting fabric.
This rotary cutter is used only for papers.
Notice it is the smaller size.
I dedicated it for paper, because I rarely cut fabric with it.

 
I retrieved Ms. Ellie from the closet.
I do wish I had a place to set her up permanently.
She is still good at embroidery,
but man, it's a heavy chore to move MC and set her up.
Both are monsters for me to lift.

The 5x7 frame is set up with painter's tape
as you see here.
The sticky side faces up.
The card is held by the sticky part of the tape.
It centers nicely in the frame as the corners of the card
touch the corner of the frame.
I had to maintain a long thread to start.
The bobbin thread always had to be pulled up
to start the stitching.
Even at that, 
sometimes the first 2 or 3 stitches might skip.
I don't know if it was Ellie the machine,
because she is temperamental
or how I wrote the file.
About 5 cards out of 50 didn't work.
The cards that were mailed,
were folded cards.
Notice how they lay in the frame.
A bit backward.

 
When the embroidery is finished,
carefully push the card out from the back,
and press down the next card. 
 
I made about 50 post cards 
and a dozen cards
in about 4 hours,
but I'm slow.
With the 2 sets of all occasion cards as gifts,
a lot of cards were made last Christmas.
Hopefully, you can download the
which I made from a free black line master
with my Master Works Embroidery Software.
I had to delete a lot of stitches,
to make this a 1 line stitching file 
that card stock can handle.
enJOY!


Friday, January 19, 2024

Fun Fri~ SIL #1 Birthday Card 2024


You may know by now
all have a story behind them 
involving the past year.
My son-in-law works in the Safety Department
of a major delivery company.
He and my daughter have also recently
adopted a new grand dog.


Above sketched with heat sensitive pen.
Below stitched by machine with brown thread.


 Brown fabric edge stitched to stabilizer.
Cut out doggie
Then stitch around body, legs and face.
Ears were left free.


Edge stitched to card front.
Wrote Happy Birthday from Nana Joy inside
Made an envelope.
Glued closed 
and mailed.