Sunday, September 29, 2013

New Baby Twin Outfits~ Free Flies & Lady Bugs

 Recently we had new arrivals at our church, twin brother and sister.  Amazingly, these little ones arrived over 7 lbs each!  However, those of us that have made baby clothes, know the newborn size of patterns are way to large for a newborn baby.  I used a variety of patterns to create this set.

Simplicity 5555 was a size 1/2.  I took it up an inch in both length and width.  The panties from the newborn pattern, I did not alter and let the length of the elastic take care of the fitting.  I took the measurements from a Cabbage Patch doll I had and it worked!
The lady bug is a machine embroidery. I got the free Lady Bug embroidery file from Embroidery RN.  She now offers it with a large number of other cute embroidery files as a part of a large zip file.  It is a part of Archive File 4 found @ https://sites.google.com/site/embroideryrndesignsinc/designs.  Look for Lady Bug TD in the zip file.
 The boy's top came from the top part of a Preemie sleeper pattern. You can download it free @ http://www.touchinglittlelives.org/prsleeper.html.  I didn't need to alter the size, but I did have to make facings for the neck area.  The pants pattern was "Made by Rae" and can be downloaded for free @
http://www.made-by-rae.com/2010/10/free-raes-basic-newborn-pant-sewing-pattern/.  The only alteration for this pattern was taking off about 2 inches from the pant length.
   The fly was a machine embroidery that was taken from a file that also included a flower which I deleted. You can find it free at the Sew Forum (membership is free) 
    Then serendipity happened.  I tried to embroidery the boy's name and the machine clogged making a hard mess to remove.  So I made a tiny pocket to put over the mistake which I think turned out better and added a more "boy" touch.
    Again, I used the Cabbage Patch doll to gauge the length and elastic for waist band and it fit perfectly.  
    The beautiful little twins wore these outfits to church today.  I'm guessing they are about 8 lbs or so now and the outfits looked like they fit perfectly.  I was so proud I accomplished the fit.

************************************
Sharing at several Linky Parties.
Thanks to the FREE programs:
possibly used for this post
GIMP for cropping & other digital effects
 Photoscape for downsizing & watermarking photo
PicMonkey creating collages used on this page
 

Thursday, September 26, 2013

Quilt Shot Block #12 ~ Spider Web

8 inch square
Found this pattern, probably in a magazine back in the mid 1970s.
To save the patterns I liked, I would trace the patterns.
 I apparently forgot to note to add 1/4 inch seam.
Never knew why magazines didn't always automatically include seam.
So this one turned out to be 8 inch rather than the 11 inch noted.

Some modern day tips I used in making this square:
Except note at the top of the strip triangle, the seams are pressed opposite to help lock in seam.

The hardest part in putting this block together is matching the center.

I didn't intend to fussy cut the sunflowers, but now I see two pieces should have had more sunflowers for a balanced look.

************************************
Sharing at several Linky Parties.
Thanks to the FREE programs:
possibly used for this post
GIMP for cropping & other digital effects
 Photoscape for downsizing & watermarking photo
PicMonkey creating collages used on this page

Wednesday, September 25, 2013

Wordless Wednesday #70~ Tobacco History Barn

The story of my childhood on the side of a barn, well the first 2 pictures anyway.
KY HWY 127
 
************************
Thanks to the FREE programs:
possibly used for this post
GIMP for cropping & other digital effects
 Photoscape for downsizing & watermarking photo

Monday, September 23, 2013

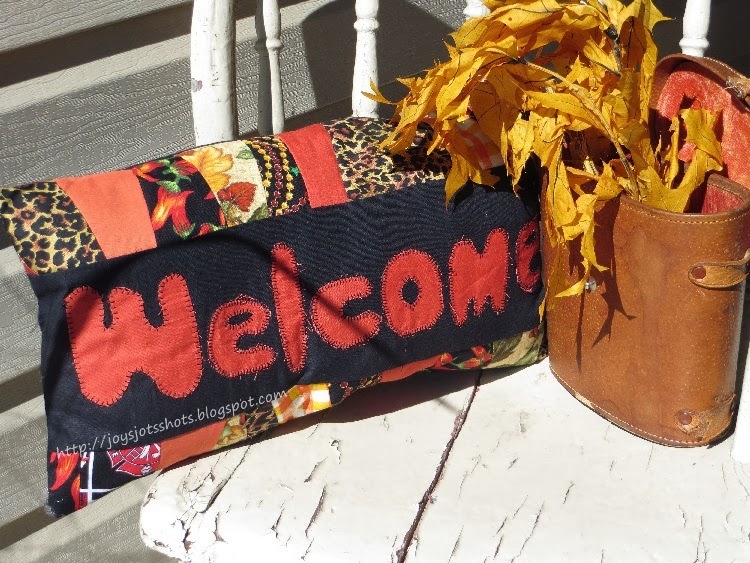
Welcome Fall Scrap Happy Pillow


Here is a way to use some of your scrap fabrics to say hello to visitors and those that pass your home.  It's a fall welcome pillow for your front porch chair.

***************
Recently we stopped at the Peddler's Mall in Elizabethtown, KY and I saw this pillow. 
I didn't care for what it said; however, it popped an idea into my head.
A welcome pillow!

Here's your tut with a bunch of pictures- cause I'm a visual learner too.
 *******************
I started with a black piece of fabric about 24 X 19½ inches.
Cut off a strip about 5 inches wide x 19½ for the "welcome sign." 
Note:  You might get strips of black from old slacks or top you can't wear anymore.
 Cut letters freehand from strips of fabric like I used to cut my letters for school bulletin boards.
Set machine on blanket stitch and reversed so I could stitch along the outer edge.

Used some scrap tear away stabilizer that was just the right size for this project.
It just kept the fabric from puckering and wrinkling.
This is why I reversed the blanket stitch, so the running stitch goes along the outer edge.
This is a time when it's great to have the automatic foot feature that will lift the foot each time you pause, so you can gradually turn your fabric as you go around the edge of the letters.
At this point you could stop if you have a need for a strip with the word "welcome."
But I had some pieces of fabric to use that reminded me of fall colors.
I cut 2 more strips 3 inches wide each.
They became the base for my strip piecing.
First piece I sewed to the black and cut off the left part in a straight line at an angle.
Next piece sewed, flipped and ironed.
Some pieces I had to make sure they extended over the edge, so when I flipped, it would cover the black.
Some pieces  needed trimming after I sewed.
If this were a pillow not to be viewed from a distance, you might consider some decorative stitches over the top of the seams like the old rag quilts.
Trimmed off excess along edge.  I used my rotary cutter and ruler.
Did a quick trimming of the stabilizer.  Wasn't too worried about it.
Pinned and stitched the strip pieces to the "welcome" piece.
I cut the remainder of the 24 inches of fabric in half and stitched those to each of the strip pieces.
Turned under the top and bottom edges about 1/4 inch.
Then determined the center of the piece by folding in half (somewhere across the middle of the letters.)  Folded, right sides together and overlapped the center about 2 inches.
Pinned and Stitched.
Turned right side out, and used some stuffing I got in a $1 bag of fabric about 2 weeks ago on the 31W Yard Sale.
Note:  If it's an outdoor pillow for display only, consider taking old clothing you want to get rid of, & cut it up in small pieces to stuff the pillow.
Yes!  I pinned instead of hand stitched it closed, because come Christmas I'll remove the stuffing & use it for the next seasonal pillow, and fold away the pillow covering for future use.  Easier to stow away pillow covers rather than pillows.
Clean off the fuzz......and.....

Done!
Related Link
************************************
Sharing at several Linky Parties.
Thanks to the FREE programs:
possibly used for this post
GIMP for cropping & other digital effects
 Photoscape for downsizing & watermarking photo
PicMonkey creating collages used on this page

Friday, September 20, 2013

Quilt Shot Block #11 ~ Clay's Choice

     No, my grandson didn't choose this block.  That just happens to be the name of the block according to the reference book I've had for years.  Back when I saved up money to buy a book, it had to be very useful.  I bought this book because it had a ton of, well 700, quilt blocks in it.  No directions or patterns for cutting given, but just the pattern block itself & you had to figure out how it was made. I used it as a source for ideas & dreaming.
I didn't make very many blocks, because it was just prior to the day of rotary cutters & mats.  Thank goodness they came along and more and more folks decided it was ok to machine stitch blocks.  There were Aunts and Grandparents that thought I had committed a sin by putting together a block on the machine rather than by hand.  Oh, it makes my hand hurt to think about it.

Just to show you I didn't name this block after my Grandson.  This is all that's given in the book.  You have to decide on measurements and created the pieces to be put together
 The cloth pieces for the block above were the last of the blocks I bought on this year's 400 Mile Yard sale back in June.  The pieces in the bag didn't go with the pattern provided.  It happened to have the right number of pieces to make Clay's Choice and then had some rectangles left over.  Therefore, this block is a 10½ inch block rather than 12½ inch like the rest.
************************************
Sharing at several Linky Parties.
Thanks to the FREE programs:
possibly used for this post
GIMP for cropping & other digital effects
 Photoscape for downsizing & watermarking photo
PicMonkey creating collages used on this page

Tuesday, September 17, 2013

Wordless Wednesday #69~ Sunflower's Foggy Night

  Behind my Mother's house in Kentucky, USA

*************************
Thanks to the FREE programs:
possibly used for this post
GIMP for cropping & other digital effects
 Photoscape for downsizing & watermarking photo

Monday, September 16, 2013

Another Hat Trick~ Bedside Pocket


Caught my "Thread Catcher Cap" for my serger being featured over at "Creating my Way to Success."  She asked for more ideas for Upcycling Hats or Caps through an ongoing linky.  If you have a hat trick, please go link it up.  


So here is another hat trick idea I had.
Stick the bill of the cap between the mattress and box springs for a bedside pocket.

When you don't feel well and have to spend a lot of time in bed,
 you never can have enough bedside space for those tissues and such.
***************************

Thanks to the FREE programs:
possibly used for this post
GIMP for cropping & other digital effects
 Photoscape for downsizing & watermarking photo


Friday, September 13, 2013

Creating Animated GIFS with GIMP & PhotoScape


Threading My Way_Featured Totally Tutorials Blog


An animated GIF is actually 2 or more pictures put together to be presented one after another so as to look like the object is moving.

        In trying to explain how to make the quilt block "Disappearing Nine Patch," I needed to show how I flipped sections of the block.  I decided to make a gif to illustrate.  That got me to finding out how to use GIMP, a free program I use instead of Photoshop, to do so.  First they directed to resize pictures with GIMP.  Doing that one at a time, took time.  That's when I turned to Photoscape, also a free program.  Please see the end of this post for more information about each program's free download.

*Use Photoscape to resize all the pictures at one time instead of one at a time with GIMP.
Size all pictures 640 X something (let ratio tool do its job) with Photoscape. Write down resulting measurement (i.e. 640 x 480).  (Remember if you are using Blogger, pictures less than 800 are NOT counted against your storage.)
* Open Gimp, File, New
*Change image size to match what you just wrote (for me-640 x 480) OK

  *Down size GIMP window to one side of your screen & open the folder holding pictures needed, down size that window to the other side of your screen.
  
* In Gimp- Open layers menu to show in toolbox (about the middle of the toolbox, is a left arrow to click on. If you've chosen the paintbrush tool, it's to the right of the word Painbrush).
* Choose add tab, Layers.)

This means all pictures transferred will appear in the Layers toolbox plus a background box. 

*In the picture folder highlight all the pictures you need to animate. (either hold the ctrl key while you click on the pictures, or hold the shift key and click on the first picture, then click on the last picture which will highlight all in between) 
 *Drag the highlighted pictures to the bottom of the "Layers" toolbox. 
 *Now, right click on the background box and delete it (you are deleting that layer).
 *Drag pictures around to put them into the order you want them to play with the first being at the top and last at bottom if they aren't already in order.
*File, save as,
*type in name of file and after name type .gif (that's dot gif) hit the enter key (after you've chosen location to save).  (I have to hit the "enter" key on my keyboard because I can't see the bottom of this window and it won't let me drag it up.)

*Save as animation, export  (don't forget to choose the folder where you want to save it.)

*1000 milliseconds (or more).  Uncheck loop forever if you like.  Finally, click Save.
Now go to the folder where you saved your GIF and try it out!

Both programs are free:
Photoscape @ http://photoscape-free.com/?gclid=CKCY_umMmbkCFWpp7AodFVIA6A 
I discovered Photoscape from Jamie over @ Mommy's Camera when I was looking for a way to watermark my shots.   I also have tutorials that explain how to resize pictures for your blog so you don't use up your blog storage space.
GIMP @ http://www.gimp.org/downloads/  Someone told me about GIMP @ school just before I retired.  I must say I don't miss Photoshop (& it's price) at all.  GIMP works just fine.
 
 *************************************
Thanks to the FREE programs:
possibly used for this post
GIMP for cropping & other digital effects
 Photoscape for downsizing & watermarking photo