 Recently our QOV had a paper piecing class to start a group quilt in
honor of a member that passed away a couple of years ago. She had come
to be know has the Paper Piecing Queen. It was said she would come to
Sit and Sew on Saturdays with her sewn pieces and sit and rip out papers the
entire time. THAT is the very reason I don't like sewing through the
foundation paper. I LOVE the No Tear or No Rip method. I get to skip
that part AND save and reuse the foundation paper again and again.
 *****************
Tuesday Tutorial
******************
I have tried to explain this method before, but I wasn't satisfied with my tutorial, so I'm trying again with more detailed pictures. I'll link the old tutorials at the end of this post.
Our class did teach the traditional foundation paper piecing method.
They said I could come and do my own thing.
Here's what I did:
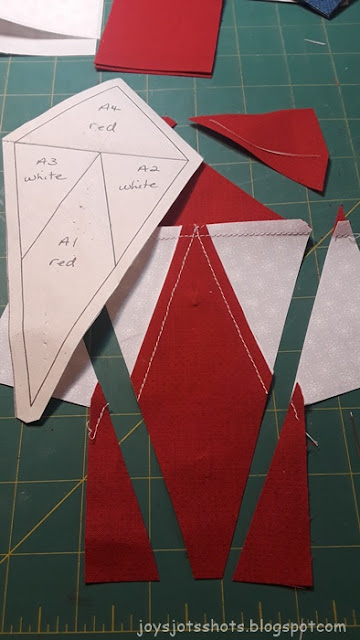
Lay wrong side of fabric to back of foundation paper.
Pin or glue in place.
Some people use freezer paper
and iron onto the back of the fabric.
Notice where section 1 & 2 are located.
Fold back directly on the line
of section 1 & 2.
looking at the print (right) side of fabric
Slide under the work piece
Slide under the work piece
allowing right sides of each fabric to face each other.
Line up edges of seam.
Here's THE TRICK I really love.
When you fold back the pattern piece you are adding,
make sure the fabric on the back side lies exactly under folded piece.
Sometimes you might have to hold it up to a light to see the back fabric.
When you eventually unfold both,
they will lay on top of each other.
The picture below may better show you
how the paper piece is laying over the white fabric?
Edge Seam Foot.
The blade of the foot guides you closely along the fold
which has to be done to be accurate.
Turn over and press
Repeat on the line between sections 1 & 3.
Fold on line
Cut Fabric
Right sides together
Stitch
Then across top for section 4
Press
Fold on line
Cut quarter inch seam
Add red fabric right sides together
Stitch
press.
or glue to hold the pieces.
Freezer paper does a good job of holding the foundation in place.
after you press.
it's time to trim on the trim line
lay the ruler's quarter inch line on the
foundation's seam line as shown above.
Then the FUN part,
where you smile
and think of everyone else that's
taking extra time to rip out papers,
YOU REMOVE THE PINS
in my case 2 pins.
Done.
I'll reuse the pattern to make the rest.
I'll probably be able to make about 12 sections
before this piece is worn out.
Then sew the sections together
each seam very steady.
I even get the nerve to
slowly stitch over the pins.
Hint: if the part of the pin you sew over
is under cloth,
it seems to work better.
Notice how the middle pin
is right at the seam.
It's hard for me to match slanted seams,
but this works well.
It's a Kaye Wood, from PBS a while back, technique.
She put pins on each side of the pin holding
the exact spot of the seam
So the top or bottom fabric wouldn't slide.
designed by one of our members
on this Saturday's Quilt Shot Block.
You'll see how accurate the seams met.
Quilt Shot Block #93~ No Tear Paper Piecing Woven Star
Quilt Shot Block 176~ Falling Star 4th of July Yard Flag
Shared @


No comments:
Post a Comment
Have a JOYful day!
Leave a comment or an email if you like.
I will enJOY either.
Please LEAVE YOUR EMAIL ADDRESS if you need a reply.