Back in November, I was thrilled when Elaina, a high school sewing enthusiast, asked if I would help make a back pack. The school had started a requirement on limited size of back packs.
So she came over to my sewing room with some old back packs she had and discussed what she liked about each one. Then, considering book sizes, we come up with a simple straight line pattern.
Since I was busy mentoring, I forgot to take a lot of pictures. Elaina was a great student. I could tell her what to do, then go off and give her space to work, but yet close enough for questions and tips.
Update: Find my free pattern for Draw Strap Back Pack Here.
**************************
Featured @


*******************************
Supplies include the
pieces shown above and including a
2½ x 16 ½ for draw string casing.
a
draw string which we used from an old back pack.
I just happened to have a front open heavy duty
zipper of just the right color which was a bit short but we took care of that problem.
Twill tape for the straps.
To make an extension for the zipper,
check out the directions for this
"Bow Clutch Purse."
or instead of top stitching end piece
lay the center mark (width mark) of the rectangle for the end piece at end of zipper,
stitch across that center mark across the end of the zipper and fold the rectangle in half.
Zipper was inserted as I did in
this post for the "Bow Clutch Purse."
Cut an 18 x 5 inch piece for the pocket on the left above.
Fold right sides together and stitch as shown above.
Cut another 12½ x 4 inch piece
Fold & stitch as shown.
For the tab cut a 5½ x 4½ inch piece.
Fold and stitch as shown.
Turn right side out & press.
Stitch hook and loop tape to pocket and tab.
Determine bottom placement of pockets.
Lay the pocket bottom edge on that stitching line upside down.
Stitch across raw edge of pocket bottom.
Turn up to hide the raw edged bottom,
top stitch the sides of the pockets using
your favorite sturdy tacking method at the top of each pocket corner.
Take front and back and place right sides together.
Place the ends of the twill tape equal distance from the center
in the bottom seam between the front and back pieces.
Its a good idea to use safety pins to hold the sides together and try on the back pack for fit.
When it comes to straps, this is where you personalize.
When placement is determined & verified, stitch across bottom only.
Press the bottom seam toward the front.
Top stitch bottom seam away from straps.
Box stitch the bottom of each strap to make stronger.
Stitch side seams.
Fold ends of the 2½ inch strip.
Fold and press ¼ inch along one long side of strip.
Place folded end of strip where you want the cord to come out,
place unfolded edge of strip right sides together with top of bag & stitch ¼ inch seam.
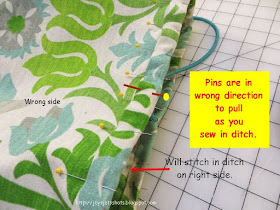
Fold over to wrong side as shown above
making sure fold is over the seam
and pin with pin heads away from bag
not as shown above.
Stitch in the ditch on the right side of bag.
Didn't she do a fantastic job!
Great job Elaina!
**********************************
Thanks to the FREE programs:
PicMonkey creating collages used on this page


Wow I wish my daughter would learn to sew let alone make her own backpack. Thanks for sharing on Crafty Moms Share.
ReplyDeleteWonderful backpack and it looks fairly easy. Thanks so much for showing us how to make it. Pinned to my Sewing board also. Best wishes, Linda @Crafts a la mode
ReplyDeleteLooks like a great project, thanks for sharing on craft schooling Sunday!
ReplyDeleteI have to get over my fear of zippers, this is too cute and too handy!
ReplyDeleteI love it!! I am featuring this on Crafty Weekends tonight!
ReplyDeleteHow satisfying to be teaching someone to sew. A great little backpack!
ReplyDeleteFeatured today, Joy...
Delete