Pages

Church Pages

Fav Blogs

Tuesday, January 31, 2023

Tues Tutorial~ Grand Daughter's 2023 Homemade Bday Card

My youngest Grand Daughter is a Civil Engineer. She just had a birthday. You know by now, I make cards from my fabric scraps. My family seems to look forward to my cards. 


*****************
Tuesday Tutorial
******************
 
First I find a clip art I'm allowed to use. This one came from Clip Art Max. I quickly found there are not many images for a woman civil engineer.
Second I opened my Open Office Word Processor and gave the page .25 inch borders and 2 columns. Making the 2 columns helps me find the quarter sections of the page. Then I pasted the clip art and resized to fit a quarter of the page, which will be the ultimate card size. I copied and pasted a second copy of the clip art on the same page. Then printed in black/white.
Third After I knew what I'd put on the card, I created the background on a backing as you see above. This was a fabric softener sheet cut the size of the card. I sometimes use a scrap of embroidery stabilizer cut the size of the card. 
Fourth I traced the clip art onto the paper side of a piece of freezer paper.  After sections of the drawing were cut out of the freezer paper as you see in the upper right corner of the picture,  the wax side of the papers were ironed onto scrap fabrics with the Clover Mini Iron. These small pieces were used as patterns to cut out the pieces of fabric.


Fifth I laid the other clip art that was printed under a piece of freezer paper that had paper side down and wax side up. The clip art drawing on the underside was simply there to guide where to place the pieces. 
The fabric pieces that had been cut out were dabbed with just enough stick glue in the center of the fabric piece to hold in place. If possible no glue was place of the edges of the fabric where I would stitch. 
The mini iron was pressed on the area of the dab of glue to firm into place.
Notice I decided to bend up the brim of the hat and not glue or stitch it down.
Sixth the paper piece with the fabric pieces glued onto it were laid on the background that had already been created (pic 1). With an Open Toe Applique foot so I could see how to get around the small pieces yet hold down the fabric, I stitched around all the edges with a 2.0 length stitch because paper needed to be torn away later. I just can't manage a free motion/mending foot yet in such tiny areas. Before I started, I somewhat lay out in my mind how I will "travel" over the entire drawing.
Notice the face is stitched over the brown hair and outer edge of brown hair not stitched. So which pieces go on top, factors into the layout as well.

Seventh after the larger pieces were stitched down, the facial features were added. This is the first time I've made a card that included pieces that were strictly glued. I used that method because the pieces were simply far to small to try to stitch down.  Glue stick was used, followed by a tap with the mini iron to hold in place.
 Eighth the paper was torn away from the stitched paper. This was a bit tedious as to not tear away stitches even with a 2.0 stitch.
Ninth the finished pieced was stitched around all four edges of the front of the card. Signed and dated back of card.
I am told by my favorite U.S. Mail Carrier that as long as I keep my pieces flat the card can go through their post mark machine and it only costs 1 stamp to send. However, if something like buttons, bows, foam stickers and other 3D elements are added then the card would need to be hand post marked, and extra postage is involved. 

I do make my own envelopes to fit these cards 1 of 2 ways.  Either way, I just use a glue stick to put them together.
  • One involves the template I downloaded from HERE at Therapeutic Crafting. When I'm in a hurry and just need 1, this is my go to. I keep the copy I printed about 10 years ago in a folder on my sewing desk. I trace over the copy, and cut the lines with rotary cutter and ruler and notch with scissors. I sometimes cut a layer of 3 sheets, so I'll have 2 more filed away and ready for later.
  • The other is using my "We R Memory Keepers" envelope maker which I found on deep discount at Tuesday Morning and decided to purchase because it would pay for itself. When I mass produce cards, like for Christmas, I go this route.
Remember envelopes don't have to be made from white sheets of paper.


Sharing @


Thursday, January 26, 2023

Thoughtful Thurs 191~ Playing Chicken with Yarn

 
Many times I play chicken with my sewing machine bobbin.
Sometimes I win, sometimes I don't.
The other day was the first time
I've EVER played chicken with my ball of yarn.
I took a chance to crochet
I won!
 Just a thought of how exciting
my life is some days.

Friday, January 20, 2023

Fun Funny Fri~ Learning the Popcorn Stitch on Popcorn Day


I just learned from my blog friend over at Paper Vernissage who always has very interesting artistic ideas, that yesterday January 19 was Popcorn Day! I am known to go to the movies sometimes more for the popcorn than the movie.
 
Would you believe yesterday I attended my Needlework Group meeting and learned how to make a mini Pray Square which involved learning how to crochet the Popcorn stitch?  The Popcorn stitch is used to make the cross you see in the picture above.
 
I see there are numerous patterns for crochet prayer squares all over the internet. We used the mini square version shown at Southern Belle. It's free. You don't have to sign up for a newsletter, it's just right on the page.
 
My Needlework group crochets the Prayer Squares to leave in our local hospital waiting room.  Above is my first square that took me a hour and half to make. It's only about 2.5x3inches which fits nicely in a hand. 
 
I always love learning something new. The feeling of the reward of accomplishing the finished product is worth it. Never to old to learn.  Its fun in my book.

Tuesday, January 17, 2023

Tues Tutorial~ First Son-in-Law's 2023 Birthday Card

 This year I'm sending out more cards to people I love and am blessed to have as a part of my family and family of friends. My cards always try to depict a part of the person's life.
  This card went to my first son-in-law I received a few years back.  He enjoys fishing and hunting. He also likes to venture out into cooking. 


*****************
Tuesday Tutorial
******************
 

I now always start with a base of some kind,
 to be my canvas 
or working area.
This is a used dryer sheet
 that was ironed flat
 between 2 pieces of paper
 to keep the residue off my iron.
The pattern is the to be card
which is a half sheet of card stock
folded in half again.
For most of my cards
I usually have a picture or clip art in mind.
This idea just came out of my head.
First a black skillet.
Keeping in mind the size of my "canvas,"
pieces are sketched on paper
then cut to use
as a pattern.
 I'm glad I've kept my
very old
much smaller pins
to use on these tiny pieces.
Can't believe I used to 
pin dress patterns with those.
 
I only had odd pieces of the forest fabric.
So, in the background tiny pieces
of what is still left from one
of my Dad's shirts
were used.
Also, love how the fabric 
gave texture to the fish.
Sometimes things like that just
pop up
begging to be used.
Since I now use a "fabric canvas"
made of dryer sheets,
scraps of plain interfacing,
embroidery stabilizer
or light weight fabrics,
the entire piece of work is stitched on
around the front face of the card.
This keeps the inside of the card
clear of working stitches.
******************************************
 
Hope my SIL had a Happy Birthday!
He sent me a thank-you text
and compliment.
Always glad to know if they got the card 
in the mail.


Tuesday, January 10, 2023

Tuesday Tutorial~ Crock Pot Hot Fudge Spoon Cake

     When Christmas Day was canceled for me with family, I decided to up my sugar level and treat myself to something sweet. I'd been admiring a recipe I had found in a Christmas book my sister had given me a few years ago.
 
So I got out my small crock pot I had found that was the perfect size for just me.  Turns out, it was actually really the perfect size for this recipe.
 
I hope you enJOY it like I did.   


*****************
Tuesday Tutorial
******************
 
From the book: Gooseberry Patch Christmas, Book 12
 
 I wondered why the word patience was on this page.
After waiting 2 hours for this cake like I did,
you will understand as well.
1 C all purpose flour
1 C brown sugar
3 T  baking cocoa
2 t baking powder
1/4 t salt
1/2 C milk
2 T melted butter
1/2 t vanilla extract
 
MIX
Place above mixture in bottom of crock pot
Combine
3/4 C brown sugar
1/4 C baking cocoa
Sprinkle above powder mixture
over the batter in the crock pot.
Do NOT mix.
SLOWLY pour 1 and 3/4 C HOT water
over the powdered mixture
so as to keep the powdered mixture
evenly spread over the batter.
DO NOT STIR
Cover 
Cook on high setting 2 hours.

Toothpick inserted one inch deep
comes out clean. 

Oh how I wished for some vanilla ice cream 
or whipped cream
for this warm 
hot fudge spoon cake.
It did taste great with my 
well creamed coffee.
Happy cozy Merry Christmas 
Me
on a -31° day.
Absolutely yummy.
 
Tip: Use the best quality baking chocolate powder
for that is the success of the best taste of course.


Friday, January 6, 2023

Fun Fri~ Mending Quilt BooBoo

    
         Call me crazy, but yes taking on the challenge of repairing a booboo on a QOV quilt is something I like to do.  You have permission to call me a geek on so many things: weather predictions, computers or rather electronics in general and tearing things apart made from fabrics and finding out how they are made. 
 
         In this repair I was able to use my knowledge I had acquired recently when learning how to hand stitch hexies. The corner of the quilt was accidentally cut while taking it off the long arm quilting frame. The quilter tried to make repairs.

         So, here is a montage of shots taken during my process.


Batting hand stitched back together


Tuesday, January 3, 2023

Tues Tutorial~ 2022 Christmas Cards

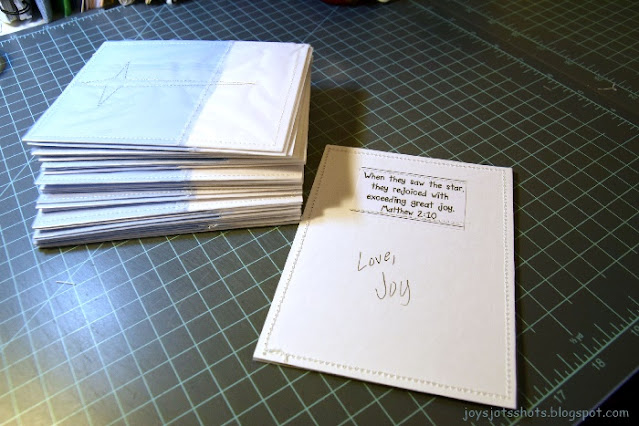
       Every year I have made the Christmas cards to hand out at church.  Here is this year's card and the process I used to create them.  
 
       You could say it is an upcycled project because a piece of a shear curtain was used to make these cards. enJOY


*****************
Tuesday Tutorial
******************
To start designing the card,
  pieces of paper the size of the card
were used
 for designing space.
 

 The size of the star was determined 
and drawn 
as well as determining the size of fabric needed.
 
I spent far more time than I imagined
just drawing a simple star that would be stitched.
I poked holes at the intersections,
so they could be marked on the card
with a heat sensitive pen.
As my sketched design above determined,
a larger than 3 inch wide blue strip
 and a larger than 2 inch wide white (shear curtain) strip were
cut, overlapped and stitched.
The stitching was rough to imitate 
a snow scenery.

 Pieces were roughly cut larger than the 
folded card stock
that was cut from half sheet of card stock.
The star imagine was laid on top of the card
and the heat sensitive pen
marked in the holes.
 
 
Then I was able to stitch from one hole to another
without drawn lines.
A gold top thread and white bobbin thread were used.
My spools of gold thread were bought way back
several years ago.
I hear the thread is better quality these days.
I had it to shred a few times.
I quickly learned not to let my thread cutter
cut the thread, and instead
pull the thread away from machine and cut.
This enabled the machine to start with longer threads
which it liked doing better.
When the thread shread and broke,
it was better to do a total rethread.
Yes, it was a bit fussy,
but the job was done patiently.

The card was then trimmed of excess fabric.


The free Open Office Word processor
was used
creating 3 columns
to make the following
Bible verse to sew on the card.


The piece of paper with the Bible verse was stitched 
across the top and bottom in white thread.
After the black dots were ironed away,
then the card was closed and stitched
around all four edges in white thread
making the card become like a post card that
would not need an envelope.


 Do you know how hard it is to 
photography sheer fabric
without it looking blurred?