Pages

Church Pages

Fav Blogs

Tuesday, June 30, 2015

Deboning & Stripping a Shirt- Making Strips for Quilts

        I started a memory quilt from 4 of Dad's shirts last July while I was staying with my Mother when she became very ill. I decided I would make the Wonky Log Cabin for this quilt, because I wouldn't have to carry my rotary cutter and board with me to Mother's since strips do not have to be precisely cut. 
     As when cutting up a chicken, there is no "right" way to cut apart a shirt, it's just your way.  You want to turn out the most usable fabric as possible.  This is how I cut strips out of Dad's shirts.  Squares might be another process.

************************
     
     First start cutting the tabs off by starting at the bottom. You can rip the tab off, but the shedding threads become annoying to me.
      Next, cut off collar.

Cut shoulder seam.

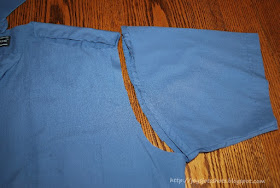
Cut around arm hole.

Trim hem and seams off sleeve.

Trim seam off top of yoke & cut along INSIDE seam of bottom of yoke.

Leaving the back intact & releasing the yoke facing.

Start cutting the sleeves in strips of desired width.
I wanted my strips to be somewhat consistent, so I used the length of my thumb as a guide as I cut.

Close the shirt, and turn up curved hem to make a straight line to cut off shirt tail.

Keeping the shirt closed, notice I didn't take apart at side seams, continue to cut shirt into strips as shown.

Then to save time when quilting so you don't have to scratch around for long vs. short strips,
fold, or roll strips. I'm not taking time to sew strips together.  I will sew pieces together later if need.


For this block pattern, I sorted into long, medium and short strips. 
Notice my scrap pile.  I'll also salvage & collect the buttons.
Would the tabs sew together to make place mats?

I will keep pockets and labels intact, & they will become a part of the quilt.
I'll even quilt this little fellow back onto the quilt somewhere.


**********************************
Totally Tutorials Blog


Thanks to the FREE program

 Photoscape for downsizing & watermarking photo & other alterations to pictures.

Monday, June 29, 2015

ITH Zipper Pouch Revision

Actually I didn't make this pouch this time in the hoop. I got so frustrated the last time, that I just cut the pieces & sewed them together.

The piece above the zipper is 9 x 4 in. folded in half to make a 9x2 and stitched to the top of the zipper.

The bottom, after embroidery, was cut 9 x 8 inches and folded to a 9 x 4 piece and stitched to the bottom side of the zipper.

Then the front was used as a pattern to cut the back piece.  It was not lined, nor was it quilted.  The seams were finished by serger.

There were 3 things I did to revise this pouch.  

1. The original designer of this ITH Zip Pouch that I found at the Sew Forum (you just need a free membership to download the file for free) instructed to, and I quote, "Use 9” or longer zipper – Nylon – not metal! Do not use a 7” zipper – you’ll be sorry!"  Well, I had probably 30 red 7" zippers and no 9" zippers.  So I decided to be sorry.  Using the 7" zipper did leave a gap at each end. So my solution was to make tabs with 3 x 1½ in. pieces.
Stitch each side.
Turn inside out.
Stitch at each end of zipper.
 Notice, this is stitched on the back side of the zipper.


2.  Use the selvage of the fabric to make a pull for the zipper.


3.  Make a small pleat to add a tiny bit more space inside the pouch.

Another birthday gift finished.
**********************************
Thanks to the FREE program
 Photoscape for downsizing & watermarking photo & other alterations to pictures.

Saturday, June 27, 2015

Quilt Shot Block #31 ~ Tic-Tac-Toe

12½ inch block

 
This pattern from:
 Quilter's Block-A-Day Calendar
by Debby Kratovil

 Started with 6½ inch block which gave me a lot to trim off the half square triangles.


Be sure to check out

Debby Kratovil Quilts Blog

**********
Sharing at several Linky Parties.
http://ninamariesayre.blogspot.com/  
Thanks to the FREE programs:

possibly used for this post

GIMP for cropping & other digital effects

 Photoscape for downsizing & watermarking photo

PicMonkey creating collages used on this page

Wednesday, June 24, 2015

Wordless Wednesday #127- Supreme Court

Found yard selling off HWY 25 in KY.


***************************
  PhotoScape used to resize & watermark shots
I've been using this software in place of Photoshop for several years.

***********************
Please see my "Linky Parties" link above for some
hard working hosts and more fabulous WW shots.

Tuesday, June 23, 2015

Large Purse Skirt- Boxed Corner Tips

     In trying to create this purse cover and avoid the inserted pattern pieces for the side and bottom which can be difficult to sew at the corners, this pattern was created to use darts and then box the corners.  Here are some tips on creating that "look" you want a boxed corner with a side seam to have.
*************** 
After you have sewn the darts
 stitched side and bottom seam,
press open the side & bottom seams.
Press darts toward side seams.
When you turn it over, the darts go downward (as seen below).
The objective is to lay the seams on top of each other.
As you feel to align the seams, you can fold over to see how well they are matching.
When you think the seams are matched,
insert a pin at the intersection perpendicular to the fabric(straight up & down).
Check on the other side to see if the pin came through the center of the seam.
Adjust if necessary until the pin goes through the middle of the seam on both sides.
With the pin staying in perpendicular position,
place a pin on each side of the seam to stabilize the seams while stitching.
Notice dart seams & opened side seams are pinned in correct position.
Stitch just above the dart stitching line.
If you stitch below, the stitching line will show on outside.
Turn inside out & this (see below) is the result you want to see.  
The side, bottom and corner seams all intersect at the exact same point.
No stitching lines show.
EnJOY your free pattern to cover your new larger skirt purse.
I'm sure you can find a dealer in your home town to purchase one of these purses.


**********************************
Thanks to the FREE program
 Photoscape for downsizing & watermarking photo & other alterations to pictures.