Pages

Church Pages

Fav Blogs

Monday, April 28, 2014

Quiet Book Cover Page- Free Embroidery File

This book cover is cut 12x12 inches, then sewn with a 1/4 inch seam, leaving a small opening to turn inside out, then top stitched around the edge approximately 1/4 inch from edge.
Look for the FREE machine embroidery file below.


In the top left corner I wanted a hole for binder ring, so that pages could be added as they were made.  Also, if children are sharing the book, pages can be taken out for each child.
   I didn't care for the circle in the available decorative stitches.  It never turned out as a circle.  So, I used my button hole attachment set at the smallest possible length (without the use of a button in the spacer).  I chose the keyhole style button hole. As you can see from the picture above, it turned out almost a circle.  The one below was too long. 
    I believe most Brother/Babylock machines now come with this puncher device that helps to punch the hole.  I haven't figured out the purpose of the side holes on this device?
      These binder rings can be purchased in various sizes from an office supply store.  I had these left over from teaching.
     You can download my
to embroider this book cover.  (no by name is included).  The apple embroidery I believe was downloaded from www.sewforum.com but I cannot find the location and give credit to the person that posted the apple.  It originally had a leaf and some shading marks.  If you claim this embroidery design, please let me know so I can give credit where it is due.

Other Quiet Book Pages:
http://joysjotsshots.blogspot.com/2014/04/quiet-book-page-easter-basket-page.html                 http://joysjotsshots.blogspot.com/2014/04/quiet-book-page-bunny-chick-finger.html


**********************************
Thanks to the FREE programs:
possibly used for this post
GIMP for cropping & other digital effects
 Photoscape for downsizing & watermarking photo
PicMonkey creating collages used on this page

Friday, April 18, 2014

Friday Foto #10 ~ My Favorite Flower? RED

Yes, I love any flower that's red.  Something about red contrasting with the green maybe?

     Some friends and family have asked me about the cameras that Mr. G and I use.  I thought I'd do some shot comparison between the two. Although, it may not be a fair comparison because I took the Nikon shots at 2pm and it was 6:30 that I realized little Canon hadn't taken pictures of the red tulips. So light is a bit different.  Don't ask me about iso settings and such.  Haven't self-taught myself yet.
      So the picture above and next few are
 Nikon D-60 shots
w/ 55-200 mm lens


Take notice of the open flower, then compare to last shot on this post.


 The next few shots were taken by a
 Canon Power Shot SX 260 HS
 w/ 20x zoom lens.


         Remember the tulip you looked at above that was wide open at 2 pm.  This is the same flower at 6:30.  I always thought tulips bloomed out for only a day and when they were wide open it was about the end of their time.  Guess not.  All the tulips had closed up for the day.

None of the pictures above were altered in anyway.

It's harder for me to hold the little Canon steady, because I can only used the view window to find my shot.  It doesn't have an eye view finder, like the Nikon only has, which helps me stabilize the camera better when I have it against my head.

Remember it's not Canon's fault its pictures are not as bright and have a cooler color affect.  That's because it was about an hour before sundown. 

**********************************************
I'm going to party @:
Kim Klassen dot Com Give me your best shot at Better in Bulk      PhotoStory Friday      
 Also: http://www.findingserendipity.com
http://www.thelongroadtochina.com/ 
 

Thursday, April 17, 2014

Thoughtful Thinking Thursday ~9~ Broken


Two years ago on the Longest Yard Sale of the World (HWY 127), I bought this statue for a couple of bucks. It reminded me of my childhood days..... barefoot and happy.   

     The owners didn't want it anymore because the right arm and the left finger were broken off.    About 2 weeks after I bought this little lawn ornament, I broke my right arm.  


My first broken bone ever.

Just think about it..........
********************* 

I'm going to party @:
Give me your best shot at Better in Bulk      PhotoStory Friday       Also: http://www.findingserendipity.com

Thanks to the FREE programs:
possibly used for this post
GIMP for cropping & other digital effects
 Photoscape for downsizing & watermarking photo
PicMonkey creating collages used on this page

Wednesday, April 16, 2014

Wordless Wednesday #92~Happy Spring Hyacinth!


*****************
 Attending these Linky Parties:
 Better in Bulk studio waterstone Wordless Wednesday on Tuesday   NanaHood.com
Also:
****************
Thanks to the FREE programs:
possibly used for this post
GIMP for cropping & other digital effects
 Photoscape for downsizing & watermarking photo
PicMonkey creating collages used on this page

Tuesday, April 15, 2014

Quiet Book Page ~ Easter Basket Page

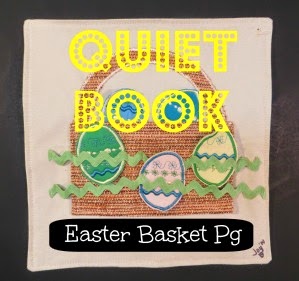
  Previously, I posted my Quiet Book Bunny and Rabbit Finger Puppet page.  On the backside of that page is the Easter Basket page.  Little hands stay busy taking the eggs out of the "grass" and putting them in the basket and vise versa.  For older children, add numbers.  Depending on colors of fabric, threads and designs you use, eggs could also be classified or grouped in different ways.  Let their little brains think and explore after you had the chance to explore the wonderful stitches you've probably never used on your sewing machine!

************************************

I used scrap pieces of fabric with a layer of dense, thin batting in between layers.  Just happened to have the brown loose weave fabric for the basket. Perfect.  The rick rack is a very old package from my Momma's stash. You can tell how old it is by the price.
Back in the late 70s and 80s, I guess you can say I hoarded things like thread because it was so cheap.  Some would say that would be a waste of money because thread can deteriorate.  I can't tell this polyester thread is any less stronger than the thread I would today have to pay more for than the cost of 7 of these spools back in the 70s.  I call it an investment as I'm having a great time using up my stash in my retirement now.
If you like creating, then you'll enJOY making the eggs for the basket. 
            The first eggs I made for the first child, I didn't add the numbers.  From now on, no matter the age, I think I will add the numbers, because one day they will be learning about numbers.  If your machine doesn't stitch numbers, then use a permanent marker.
           This is also another time you get to use your threads like a kid with a box of crayons.
        I stitched as many eggs as possible with the one loaded color.
All eggs were decoratively stitched, then cut out and satin stitched around the edge.  I could have made an embroidery file to do all this, but this left the creativity more to me and the fabrics I have on hand. 

 On a 12 x 12 cloth page, as explained on the Rabbit Finger Puppet page, I first cut out the handle pattern on freezer paper.  Ironing the wax paper pattern, wax side on fabric, attaches the pattern to the fabric and makes it much easier to cut out than using pins. (sorry no pics).  After you've appliqued the handle to the page, then add the basket bottom.
The basket bottom is stitched like the pocket for theRabbit Finger Puppet page 
The Rick Rack was tacked leaving spaces for eggs to fit.

If you need a pattern for the handle of the basket and an egg, you can download my template here.


**********************************
Thanks to the FREE programs:
possibly used for this post
GIMP for cropping & other digital effects
 Photoscape for downsizing & watermarking photo
PicMonkey creating collages used on this page